What does the process of uploading, reviewing, and publishing plans in ConstructionOnline look like?
Are there specific guidelines I should follow when uploading my plans?
How long do plans take to upload?
What should I do if my plans fail to upload?
Can I change my Redline Planroom sheet number?
What tools are available in Redline Planroom?
I want to share plans with my clients and/or subs. How can I do this?
My client/sub can't see their plans in the Portal. How can I fix this?
I want to view plans from one specific plan set. How can I do this?
Can I compare revisions of my plans?
I uploaded my blueprint plans to Files. How can I mark them up and share them?
Can subs mark on plans through Redline Planroom?
Is there a way I can keep my original sheet without the markup?
How do I upload sheets to Redline Planroom?
How do I upload revised sheets to Redline Planroom?
How can I show where a To Do, RFI, Change Order, etc. is on my plan?
Can I pin an existing RFI, Punch List Item, Change Order, etc. to my plan?
Does Redline Planroom offer automatic callout scanning?
Can I lay one sheet on top of another?
How do I compare two different sheets?
How do I sort plans in Redline Planroom?
How do I add tags to Redline sheets?
Can I recalibrate my sheets in Redline Planroom?
How do I print a sheet from Redline Planroom?
How do I share a sheet from Redline Planroom?
What does the process of uploading, reviewing, and publishing plans in ConstructionOnline look like?
Uploading plans to Redline Planroom is a two step process—plans are first added to ConstructionOnline, then processed by Redline Planroom. If you follow our plan upload best practices, your plans should process with no issues and you can continue with the sheet review & publish process. A visual model of this process can be found within the Redline Planroom Workflow article.
Are there specific guidelines I should follow when uploading my plans?
Yes! To ensure your plans always upload successfully, please adhere to the following guidelines:
- All uploaded sheets must be the same size—ideally, an architectural plan size of 24x36. If there are several different sized sheets saved within one file or in the same upload, there is a good chance the upload will be unsuccessful.
- All sheets must be vector PDFs. Redline Planroom's OCR scanning is not compatible with any other file types, such as IMG, DOCX, DWF, or CAD. More information on sheet requirements can be found here.
- Do not include special characters (e.g. #) in the name of the plan set.
- Have a strong, stable internet connection (200 - 300 Mbps). A weak or spotty connection may cause the upload to fail.
- Use one of ConstructionOnline's recommended web browsers: Google Chrome, Microsoft Edge, or Firefox.
- Use a desktop or laptop computer running a non-mobile operating system, like Windows or MacOS.
A successful upload will display the plan set in the publish log as "Pending Review". Clicking on the button "Review & Publish Sheets" will start the scanning process, where Redline Planroom will scan for sheet numbers, name, and callouts.

How long do plans take to upload?
Uploading plans to Redline Planroom is a two step process—plans are first added to ConstructionOnline, then processed by Redline Planroom. If you followed our plan upload best practices, your plans should process with no issues. That being said, if your plans are a larger file size, processing will take a little longer—the exact time depending on the specific file size and format. Additional factors such the number of pages in your plans, the inclusion of both raster and vector PDFs, and server load can also impact the time it takes for your plans to upload.
The exact time it will take for your plans to upload may range from a minute to a few hours, all based on the factors from above. If the plans take more than a minute to upload, ConstructionOnline will send you an email once the upload has finished—notifying you that the upload process has been completed and you can continue with the sheet review & publish process. You may need to check your spam folder for the email. You can also refresh the publish log regularly to see if your plans have uploaded. While waiting for your plans to upload, you can continue to use ConstructionOnline as normal.

What should I do if my plans fail to upload?
After several hours, if you still haven't received an email or the publish log still displays "Redline Planroom is processing your latest plan upload" (despite several refreshes), there is a chance that your plans may have failed to upload. Plan uploads can fail if you are using a non-compatible browser or if your internet connection was interrupted during upload. Plans can also fail to upload if your files are not the correct format, password protected, encrypted, or corrupt. Here are a few solutions for failed uploads:
- Check your browser & internet speed
- Ensure you are uploading from a recommended browser for ConstructionOnline: Google Chrome, Microsoft Edge, or Firefox.
- Verify that you have a stable internet connection with a download speed between 200 and 300 Mbps.
- Re-upload your plans to Redline Planroom.
- Check the file format of your plans
- If your plans are stored in a zip file, unzip the file and save the files individually as Redline Planroom cannot process or open compressed files.
- Check that your plans are not stored within a shared drive or folder. If they are, move them to your local machine or save them to ConstructionOnline Files.
- Ensure that your plans are in vector PDF format. If your plans are currently a non-compatible file type, such as DWF, CAD, or IMG, convert & save them as vector PDF files—not raster. More information on vector vs. raster PDF formats can be found in the article Redline Planroom Sheet Requirements.
- After verifying your plans are the correct file format, re-upload your plans to Redline Planroom.
- Open the PDF files
- Sometimes, PDF files need to be updated for a successful upload. Open your files with a third-party PDF viewer like Adobe Acrobat, then save the files again. If the files are password protected or encrypted, remove the protection before saving.
- If you were unable to open & view the files, or an error message was displayed, it is likely that the PDF files are corrupt and need to be repaired.
- Repair the PDF files
- Redline Planroom cannot import and analyze corrupt PDF data. PDF corruption is often the result of interruptions to file downloads & transfers, hard-drive disk failure, email encryption issues, or opening the PDF file with an incompatible program. Repair your PDF files with third party software (such as Adobe Acrobat or an online pdf editor), then save the files again.
- Re-upload your plans to Redline Planroom.
- If you are still having issues with the corrupted files, request a new version of the files from the original creator.
If none of the above solutions have resolved your problem and you have attempted to upload at least three times, contact our Support team for additional assistance.
Can I change my Redline Planroom sheet number?
No, there is no way to change the number associated with your sheets. Sheet numbers are automatically assigned in chronological order upon sheet upload.
What tools are available in Redline Planroom?
Redline Planroom offers a host of tools that allow you to effortlessly upload, markup, and share plans with your team. The following tools are currently available in Redline Planroom:
- Freehand Drawing Tool & Highlighter
- Shape Drawing Tools including Rectangle, Ellipse, Polygon, Freehand Polygon, and Cloud
- Line & Arrow Drawing Tools
- Measurement Tools including a Calibrator, Ruler, and Shape Measurement Tools.
- Sheet Note Tools for adding text
- File Attachment Tool for adding additional documents onto your sheet
- Callout Link Tool for linking to other sheets
- Pin Tool which allows you to pin new and/or existing ConstructionOnline items directly on your sheet
- Redline Planroom currently supports the ability to pin the following items: To Dos, Punch List Items, Checklist Items, Change Orders, RFIs, Daily Logs, Client Selections, Submittals, Transmittals, Calendar Events, and/or Leads.
- Symbol Placement Tool with options for Electrical, Plumbing, and HVAC
Once you are finished editing your plans, you also have the ability to print, email, and/or share the edited sheets right from within Redline.
I want to share plans with my clients and/or subs. How can I do this?
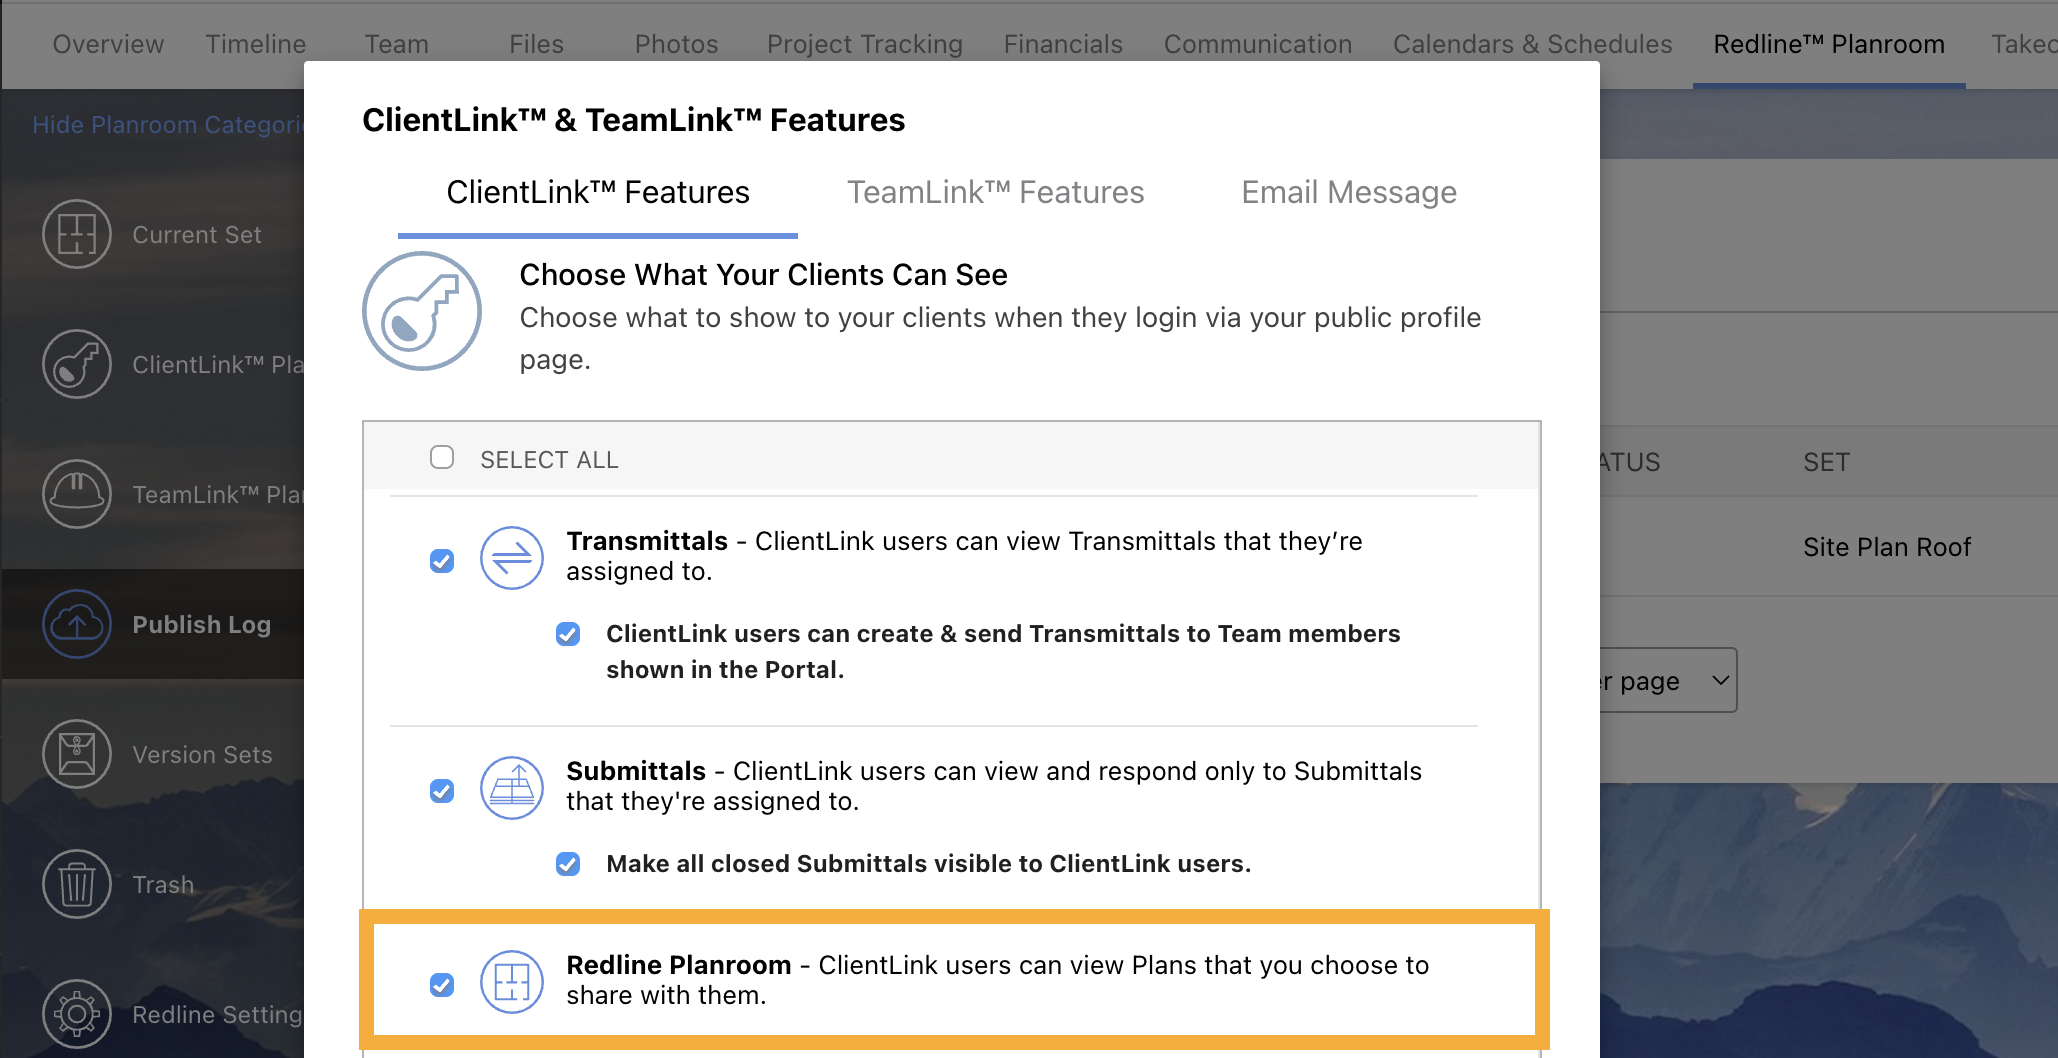
To share plans with clients and/or subs, first check your company's global ClientLink and/or TeamLink permissions. Permissions for Redline Planroom must be marked as "ClientLink/TeamLink users can view Plans that you choose to share with them".
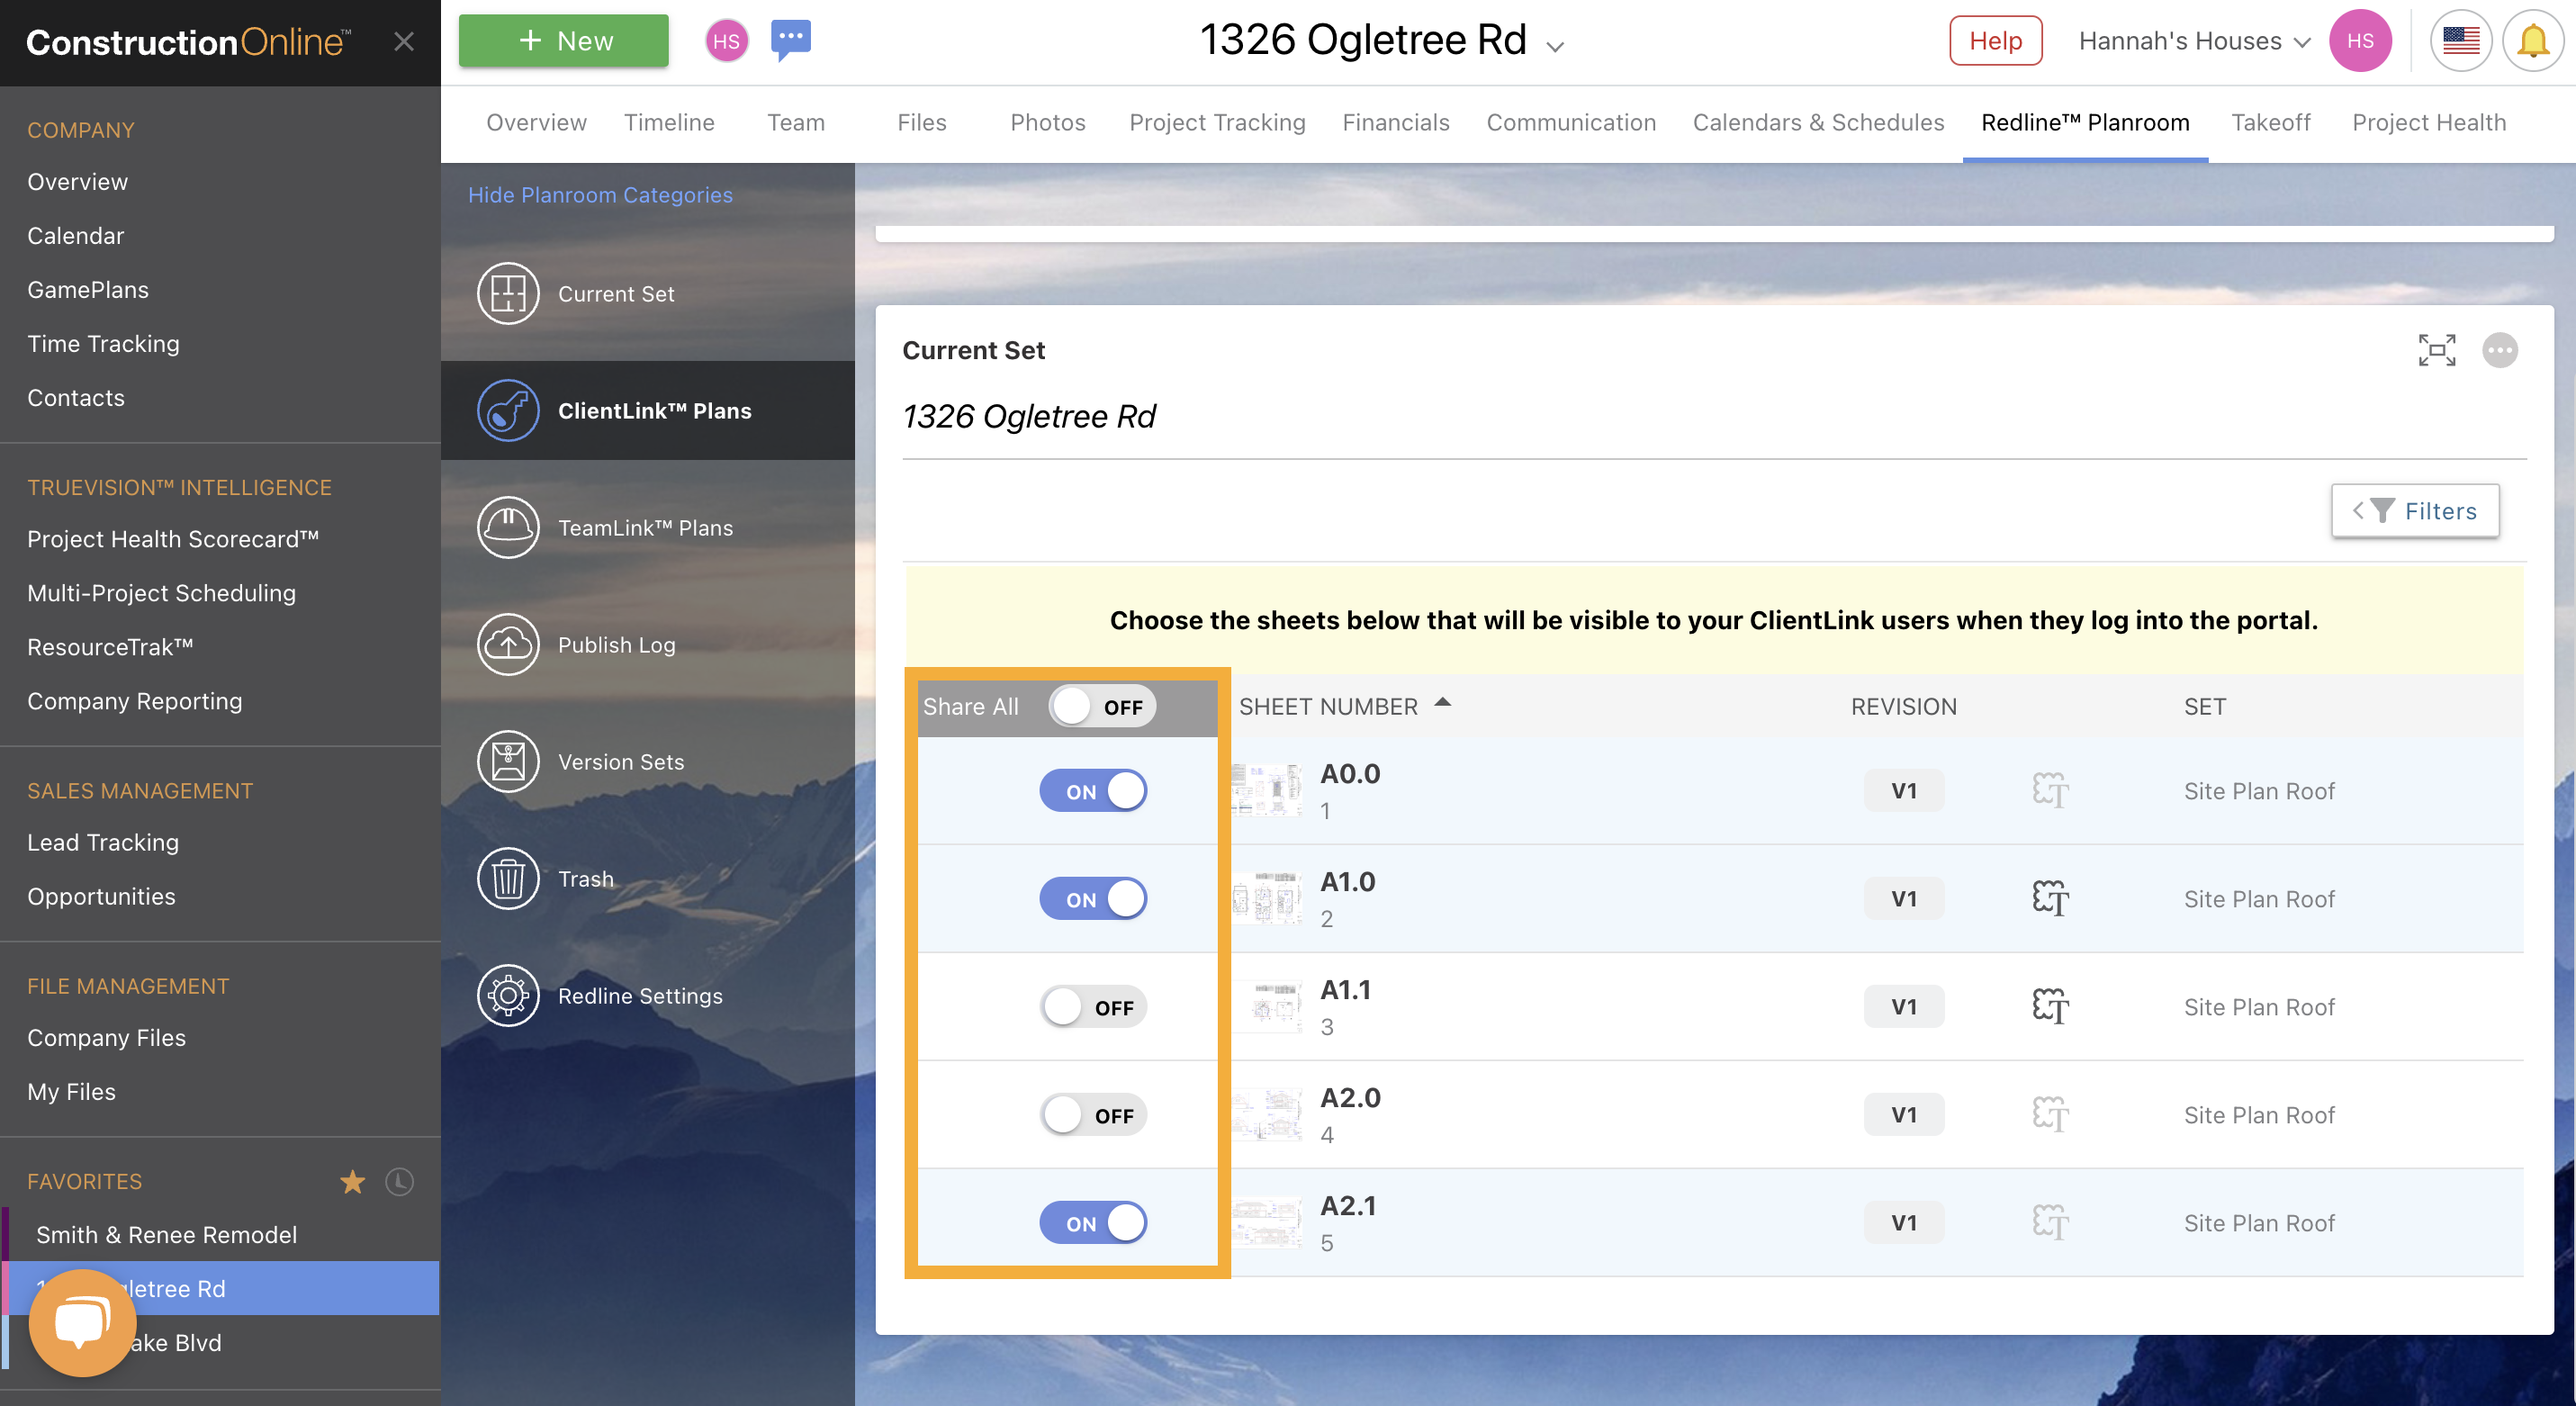
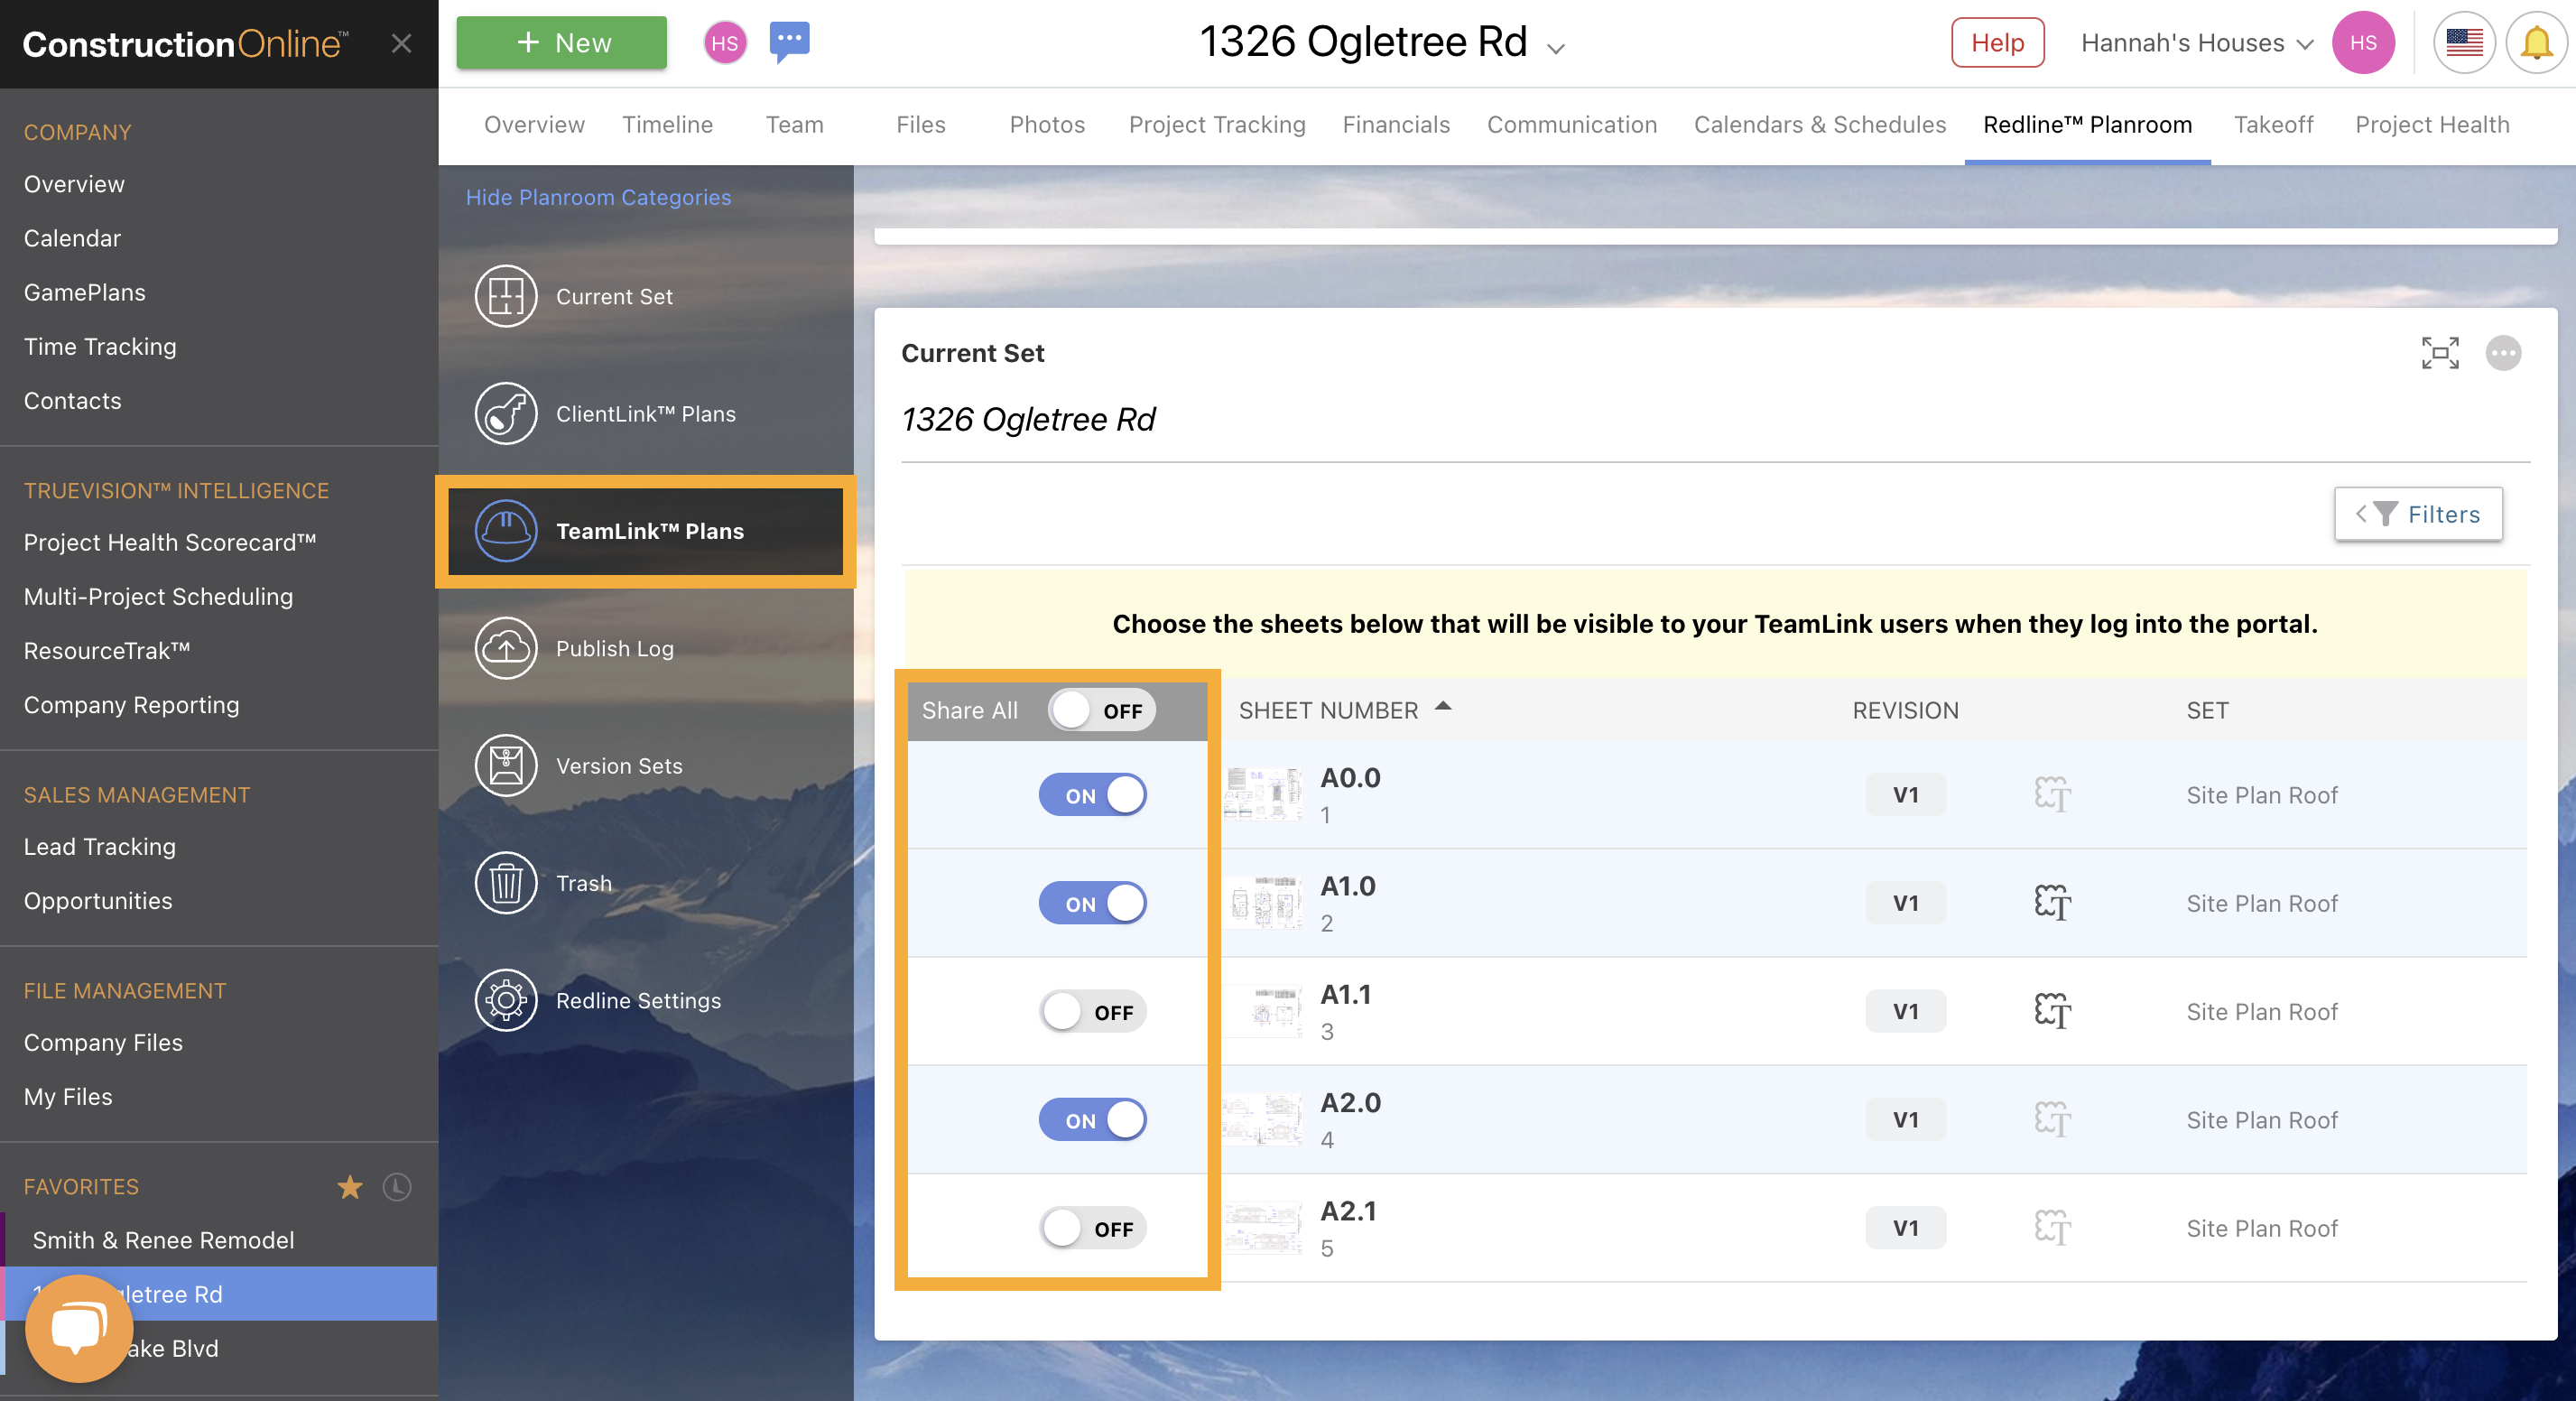
After ensuring their permissions are correct, go to the Redline Planroom section of ConstructionOnline and select the ClientLink Plans or TeamLink Plans category. All published Project plans will be visible. Using the provided toggle buttons, turn on which plans you want to be visible to your clients/subs. The "Share All" toggle button can be used to show all Project plans if desired.
My client/sub can't see their plans in the Portal. How can I fix this?
There are a number of reasons why your client or sub may not be able to see their plans in the Portal:
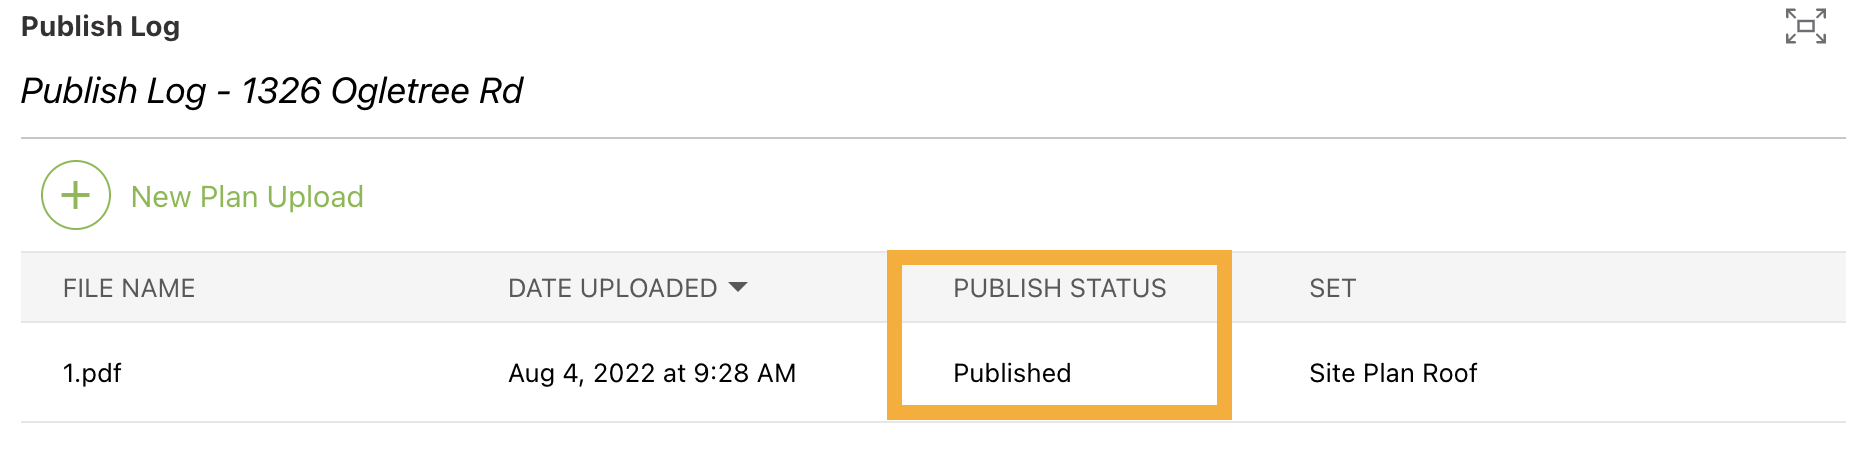
- Plans were never published: Ensure that the specific plans actually exist within the Project and can be see in the ClientLink Plans or TeamLink Plans categories of Redline Planroom. If they do not appear, double check that the plans were actually published. Only published plans can be shared with clients and subs. If the plans successfully went through the entire upload & review process, they should have a Publish Status of "Published" within the Publish Log—not "Pending Review".
- Permissions: Check your company's ClientLink or TeamLink permissions and ensure permissions for Redline Planroom are set as "...users can view Plans that you choose to share with them". More information on managing ClientLink and/or TeamLink Permissions can be found here.
- Plans not shared: To share plans with clients and subs, plans must be manually shared after publish. Within the ClientLink Plans or TeamLink Plans categories of Redline Planroom, check to see if the toggle buttons for the specific plans you want to share in the Portal have been toggled "ON".
I want to view plans from one specific plan set. How can I do this?
To only view plans from one specific plan set, click the "Filters" button. This will allow you to select the specific plan set as a filter, which will filter out all the other plan sets from your view.
Step-by-step instructions for filtering sheets by version set can be found here.
Can I compare revisions of my plans?
Yes! If you'd like to compare revisions of your plans in Redline Planroom, simply right-click on the desired sheet and choose "Compare Revisions" from the dropdown menu. This will open the "Choose Revisions to Compare" window where you can select two or more revisions to compare for the sheet you selected. Once you've made your selections and hit the blue "Choose" button, ConstructionOnline will launch the Compare Revisions interface where you can review revisions of the selected plans as well as export the comparison.
I uploaded my blueprint plans to Files. How can I mark them up and share them?
To markup plans and share them with subs, clients, or other users, you will need to use Redline Planroom—ConstructionOnline's powerful feature for users to upload, markup, and share plans with construction teams. Markup and other plan-centric tools are not possible from the Files section of ConstructionOnline.
Get started with Redline Planroom by uploading your plans from Files to Redline Planroom.
Redline Planroom is only available for companies with a Team, Business, or Enterprise Plan. If you are unsure which plan your company has, check your company's ConstructionOnline subscription level by accessing your Company Account details.
Who can see markup on plans?
Company, ClientLink, and TeamLink Users with permission to view plans in Redline Planroom can see public markup added to plans.
By default, all markup added to plans by Company Users is made public. However, Company Users with permissions for Redline Planroom as "Can Add & Update Plans" or higher can choose to turn on Private Drawing Mode. Private Drawing Mode allows a user to add private markup that is only visible to the user themselves.
Can subs mark on plans through Redline Planroom?
Yes, subs and other TeamLink Users can mark on plans in Redline Planroom. However, any markups your subs add will be set as "Private" by default. Markups set as "Private" are only visible to the user who added it. If your sub changes a markup's visibility to "Public", the markup will be visible to you and other users.
Is there a way I can keep my original sheet without the markup?
Yes! Any markups you add are always added on top of the original sheet. The original sheet can be retained by choosing to print, share, or download the original sheet without any markup or annotations.
Additionally, you can use layers to add markup to your plans. Layers allow you to stack different markups on top of each other, without altering the original sheet or any previous markups.
To add a new layer to a sheet, expand the Layers menu found in the lower-right corner of Redline Planroom. Click the (+) Add New Markup Layer button, then enter a name for the new layer. This will help you distinguish between the different layers and your original sheet. Make sure the new layer is selected, then begin adding your desired markup.
To view the original sheet without any markup, simply mark the eye icon next to each layer with markup you wish to hide. Click the eye icon again to show the markup once more.
How do I upload sheets to Redline Planroom?
Uploading plans to Redline Planroom is a two step process—plans are manually added by the user to ConstructionOnline, then automatically processed by Redline Planroom.
⭐ Best Practice: Before uploading any sheets, we highly recommend you read over Redline Planroom's sheet requirements to ensure your plans follow the formatting requirements.
- Within Redline Planroom, click the green (+) Add New button.
- Select the "Upload Plans" option.
- Choose your desired upload method. Select the option "Create a New Set" to create a brand new plan set.
- Instructions for the upload method "Add Updated or Revised Sheets" can be found here.
- Enter a name and date for the version set. Note that the current date is automatically selected.
- Within the Upload Plans(s) window, choose how you would like to upload your sheets. Sheets can be uploaded from your computer, ConstructionOnline, or an integrated Cloud Storage Platform.
- ⭐ Best Practice: We recommend uploading sheets from your computer or ConstructionOnline Files. If sheets are uploaded from a shared drive or folder, there is a chance the upload will fail as Redline Planroom cannot access locked or protected content.
- After uploading your sheets, the "Processing Plans..." window will appear and notify you that Redline Planroom is processing your plan upload. You will receive an email when the sheets have finished processing and are ready for review. Click the "Close" button to exit out of the window.
- You can see if your sheets have successfully processed by:
- Checking your email inbox for an email with the subject "Sheet processing for your recent upload is complete" or
- Periodically refreshing your Planroom Publish Log to see if it contains the set with a publish status of "Pending Review".
Once your sheets have processed, you will be ready to review and publish your sheets!
❗ If you think your sheets may have failed to upload or process, check out our troubleshooting tips and best practices for sheet uploads here.
How do I upload revised sheets to Redline Planroom?
To upload revised sheets to Redline, follow the steps below.
- Within Redline Planroom, click the green (+) Add New button.
- Select the "Upload Plans" option.
- Choose your desired upload method. Select the option "Add Updated or Revised Sheets" to add revisions.
- Enter a name and date for the version set. Note that the current date is automatically selected.
- Revised/updated sheets will be labeled as "V2, V3, V4...", as long as the sheet numbers you later assign already exist within a previous plan set.
- Within the Upload Plans(s) window, choose how you would like to upload your sheets. Sheets can be uploaded from your computer, ConstructionOnline, or a cloud storage platform.
- ⭐ Best Practice: We recommend uploading sheets from your computer or ConstructionOnline files. If sheets are uploaded from a shared drive or folder, there is a chance the upload will fail as Redline Planroom cannot access locked or protected content.
- After uploading your sheets, the "Processing Plans..." window will appear and notify you that Redline Planroom is processing your plan upload. You will receive an email when the sheets have finished processing and are ready for review. Click the "Close" button to exit out of the window.
- You can see if your sheets have successfully processed by:
- Checking your email inbox for an email with the subject "Sheet processing for your recent upload is complete" or
- Periodically refreshing your Planroom Publish Log to see if it contains the set with a publish status of "Pending Review".
Once your sheets have processed, you will be ready to review and publish your sheets!
❗ If you think your sheets may have failed to upload or process, check out our troubleshooting tips and best practices for sheet uploads here.
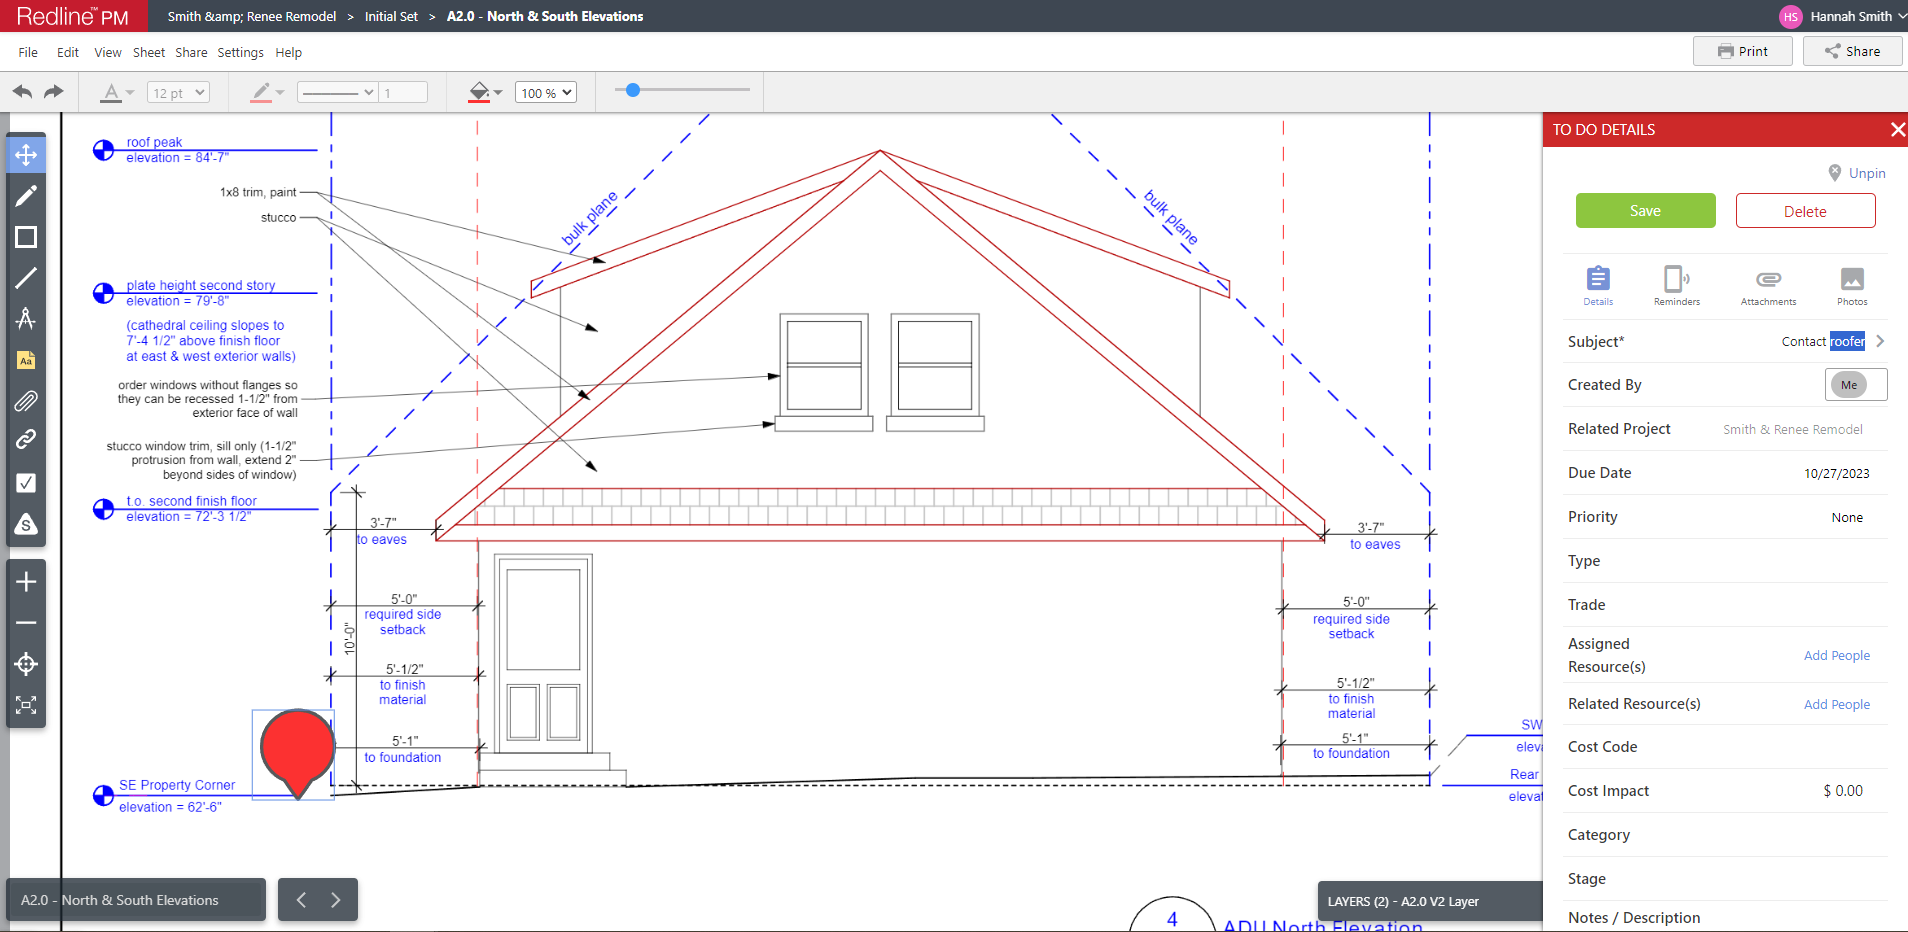
How can I show where a To Do, RFI, Change Order, etc. is on my plan?
You can show where an item is by pinning it to your plan! Pinning items to sheets can help team members know exactly where on site they need to be and what needs to be completed. You can pin Files, To Dos, Daily Logs, Punch List Items, Checklist Items, Selection Choices, Change Orders, RFIs, Submittals, Transmittals, Calendar Events, or Leads directly on a sheet in Redline Planroom.
When an item is pinned to a sheet, a red balloon icon will appear in its place. Clicking on the icon will reveal details for the specific item.
Step-by-step instructions for pinning existing items to a sheet can be found here.
Can I pin an existing RFI, Punch List Item, Change Order, etc. to my plan?
Yes! You can pin Files, Daily Logs, To Dos, Punch List Items, Checklist Items, Selection Choices, Change Orders, RFIs, Submittals, Transmittals, Calendar Events, or Leads directly on a sheet in Redline Planroom.
When an item is pinned to a sheet, a red balloon icon will appear in its place. Clicking on the icon will reveal details for the specific item.
Step-by-step instructions for pinning existing items to a sheet can be found here.
Does Redline Planroom offer automatic callout scanning?
Yes! When you upload your plans, Redline Planroom's UDAi machine learning technology scans your plan set and detects any callouts—automatically linking them to the correct detail or index sheets. In addition to automatic callout scanning, Redline Planroom also allows you to manually add callouts when you are working on an individual sheet. More information on manually adding new callouts can be found here.
Can I lay one sheet on top of another?
Yes, you can lay one sheet on top of another with comparisons! Redline Planroom provides you with options to lay two different sheets on top of one another OR two different version of the same sheet on top of one another.
More information on comparing two different sheets can be found here.
More information on comparing two different versions (revisions) of the same sheet can be found here.
How do I compare two different sheets?
To compare two completely different sheets, you can use the "Compare Sheets" option found within the Current Set category of Redline Planroom. This option allows you to view both sheets on top of each other, with additional choices to adjust the alignment of the sheets or only show one sheet at a time. The generated comparison can also be exported as a PDF if desired.
Looking to compare two different versions of the same sheet? Instructions for comparing revisions can be found here.
How do I sort plans in Redline Planroom?
Plans can be sorted by sheet number, revision, set, and tags in Redline Planroom. To sort plans within the Current Set category of Redline Planroom, click on the corresponding column header. ConstructionOnline will automatically rearrange the plans to fulfill your sort selection. An up or down arrow will appear next to the column header, indicating that the column was sorted.

How do I add tags to Redline sheets?
To add a tag to a sheet, right-click the desired sheet and select the option "Edit Sheet". You can select one of the default sheet tags or add/customize one of your own by selecting the gear icon. More than one tag can be added per sheet. Click the blue "Save" button once you are finished adding the desired tag(s).
Can I recalibrate my sheets?
Yes! You can recalibrate your sheets by navigating to Settings > Calibration Method > and choosing either Measure on Sheet or Standard Scale. Choosing the Measure on Sheet option will automatically re-engage the Calibrator so that you can adjust your calibration values. Choosing the Standard Scale option will allow you reselect the scale you wish to use for your measurements from the provided list of common scales.
How do I print a sheet from Redline Planroom?
Sheets can be printed by right-clicking on the desired sheet from the Current Set pane and selecting "Print" from the dropdown menu, or by clicking the 🖨️ Print button in the top right-hand corner of Redline Planroom. Once you've selected the print option, you can choose between two ways to print:
- Print Sheet Only - Prints sheet with markup only
- Print Sheet & Report - Prints sheet with markup, pinned items, and descriptions
Once you've made your selection, ConstructionOnline will prompt you to choose from additional custom options including printing full size or letter size (available when printing sheet only), filtering by Resource, and choosing from different item types to include. By default, ConstructionOnline chooses to include all Public Markup & Annotations when printing from Planroom, but you can also include any Private Markup, Takeoff Measurements and/or Pinned Items by marking the ☑️ checkbox next to the desired item types.
For step-by-step instructions regarding printing Redline Sheets, visit this article.
How do I share a sheet from Redline Planroom?
There are a couple of different ways you can share sheets from Redline Planroom:
👉 From the Current Set pane, right-click on the desired sheet and mouse over the "Share" option in the dropdown menu. This will present you an additional menu where you can choose to share via email, download, or share to ClientLink and/or TeamLink Users.
👉 From within Redline Planroom, click the "Share" button located in the top right-hand corner. Once you've clicked the Share button, ConstructionOnline will open the Share Sheet(s) window where you can choose to share the sheets full size or letter size, filter by Resource, and choose from different item types to include. By default, ConstructionOnline chooses to include all Public Markup & Annotations when sharing from Planroom, but you can also include any Private Markup, Takeoff Measurements and/or Pinned Items by marking the ☑️ checkbox next to the desired item types.
Once you've made your selections, you will be prompted to share your sheet via one of the following ways -
- Email or Share Link - Choosing this option gives you the ability to choose Recipients to email the file to AND/OR provides you with a sharable link you can copy and send to anyone.
- Copy to Cloud Storage - Choosing this option opens the Cloud File Integration window where you can share the file to your preferred cloud storage location. ConstructionOnline supports Cloud File integrations with Google Drive, OneDrive, Dropbox, Box, and Google Maps.
Have more questions?
We're here to help! Chat with a Specialist by clicking the orange Chat icon in the bottom left corner or contact UDA support for additional options.