BACKGROUND
As part of ConstructionOnline's comprehensive construction management software, users have access to Redline™ Planroom - revolutionary online tools for the markup and management of construction plans and drawings. In Redline Planroom, users can upload construction plan sets, add markup to sheets, enter notes, link photos, manage plan revisions, record measurements, and more. Redline's plan-centric approach to project management helps to make sure construction projects are managed with ultimate efficiency, introducing intuitive options that allow users to pin construction change orders, RFIs, schedule tasks, punch lists, and more directly to plan sheets for easy access and improved visibility.
THINGS TO CONSIDER
- To ensure the best experience with Redline Planroom, review the Redline Sheet Requirements to ensure plans are scanned correctly.
- Measurements intended to be utilized for online takeoff and estimating should be entered through Redline™ Takeoff. Click here to learn more about how to Start a Takeoff.
- Permissions: Redline Planroom markup & measurement tools are available for Company Users with Redline Planroom permissions set to "Can Add & Update Plans" or "Can Add, Update, & Delete Plans."
- Company Users with "Can View" permissions have read-only access to plan sets in Redline Planroom and cannot utilize measurement or markup tools in Redline Planroom.
- Mobile App: Redline Planroom markup & measurement tools are accessible via CO™ Mobile, the construction mobile app companion for ConstructionOnline.
STEPS TO USING THE REDLINE MEASUREMENT TOOLS
- Navigate to the desired project via the Left Sidebar
- Select the Redline Planroom tab within your Project
- This action will present you with the project's "Current Set" - or the most recently updated version set of construction plans for your Project.
- Click the sheet you wish to access. Sheet will open in a new tab.
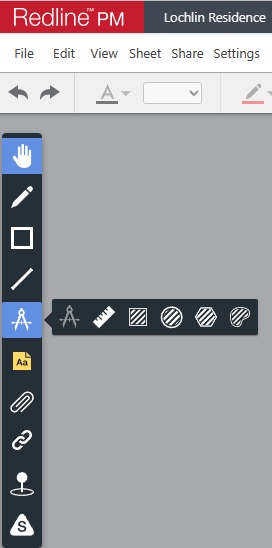
- Access to the Measurement Tools is available from the Left Side Bar Menu in Redline Planroom. Hovering over the measurement icon will present multiple options for calibration and types of measurements.
- First, you must set the calibration for the sheet. Calibration is done on a sheet by sheet basis.
- Calibration may be set in 1 of 2 ways -
- Measure on Sheet: Measure a known distance on the sheet and enter a scale for measurement reference
or - Standard Scales: Select from any of the provided general scales to serve as a basis for sheet measurements
To learn more about Calibration Settings in Redline Planroom, click here. - Measure on Sheet: Measure a known distance on the sheet and enter a scale for measurement reference
- Calibration may be set in 1 of 2 ways -
- Once the Calibration for the Sheet has been set, you'll be able to begin documenting measurements. To begin, you'll select the measurement type that best suits your needs from the Measurement Tools Menu on the Left Side Bar:
- Ruler: For straight line measurements
- Area Rectangle: Provides the area of any sheet selection in the shape of a square or rectangle
- Area Ellipse: Provides the area of any sheet selection in the shape of a circle or oval
- Area Polygon: Provides the area of any sheet selection within a multi-sideded shape made up of straight line sides.
- Click once to begin the straight line of your first side. Click at any point to end the current straight line and pivot to drawing the next side. Continue this process until you have selected the desired area on the sheet.
- Return to the first point at the beginning of the shape, and the tool will snap to close the shape, or double-click at any time to finish.
- Area Freehand: Provides the area of any sheet selection included within a freely drawn, fully enclosed shape. Best for irregular shapes and/or sharp curves.
- After selecting your desired Measurement Tool, simply place your cursor on the sheet and click to begin measuring.
 Upon completion of each measurement, the measurement calculated based upon Sheet Calibration Settings will appear alongside the measurement shape on the sheet, and you will be prompted to enter additional, optional details regarding the measurement, including -
- Name of Measurement
- Trade, where applicable
- Assigned Contacts, where applicable
- Description of Measurement
- Visibility
- Click "Close" to save your Measurement Details and complete the measurement.
HAVE MORE QUESTIONS?
- Frequently asked questions (FAQs) about Redline Planroom can be found in the article FAQ: Redline Planroom.
- If you need additional assistance, chat with a Specialist by clicking the orange Chat icon located in the bottom left corner or visit the UDA support page for additional options.