Edit a Selection within Client Selections
Manage Selection details within ConstructionOnline's industry-leading online selection sheets tool
BACKGROUND
Designed to improve both team communication and client relations, ConstructionOnline's Client Selections tools offer Company Users powerful, intuitive solutions for creating & tracking online selection sheets. Client Selections within ConstructionOnline™ contain a multi-level approach with organizational levels including Categories, Selections, and Selection Choices. A property of Categories, Selections help Users organize their Selection Choices by detailing the common values for the Choices that will be included within that Selection. These common values include Location, Due Date, Allowance, Milestone, Cost Code, Trade, and various Notes. In the event that these values need to be edited, ConstructionOnline™ provides flexible options for quick & easy modification.
STEPS TO EDIT A SELECTION WITHIN A CATEGORY
- Navigate to the desired Project via the Left Sidebar.
- Click the Financials tab and choose the Client Selections category.
- Scroll to the Selection Details pane and find the desired Selection you wish to edit.
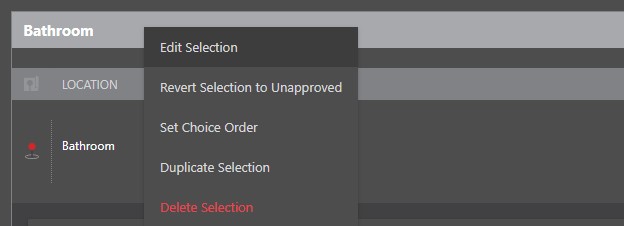
- Right-click on the Selection you wish to edit and choose "Edit Selection" from the dropdown menu.

- Within the Edit Selection window, make your desired modifications to the Selection:
- Selection Name: Remains the original Name given when the Selection was last edited, unless otherwise modified
- Location: Populates the original Location set when the Selection was last edited, unless otherwise modified
- Due Date: Remains the original Due Date selected when the Selection was last edited, unless otherwise modified
- Allowance: Populates the original Allowance allotted when the Selection was last edited, unless otherwise modified
- Milestone: Update the Milestone within the Project Schedule to which the Selection is linked to if necessary
- Cost Code: Update the desired Cost Code for the Selection from the dropdown menu
- Cost Codes must be assigned to the Project to populate here
- Trade: Update the Trade attached to a Selection from the dropdown menu
- This field can be customized.
- Selection Notes: Add any additional Notes about the Selection here
- Selection Choice Visibility: Update the visibility settings to designate which Selections and subsequent Choices are visible for ClientLink™ Contacts in the ClientLink™ Portal, if needed. The two visibility settings options are:
- This Selection and its Choices will be visible to clients in the ClientLink™ Portal if they have permission to view Selections.
- This Selection and its Choices will not be visible to clients in the ClientLink™ portal, regardless of their permission settings.
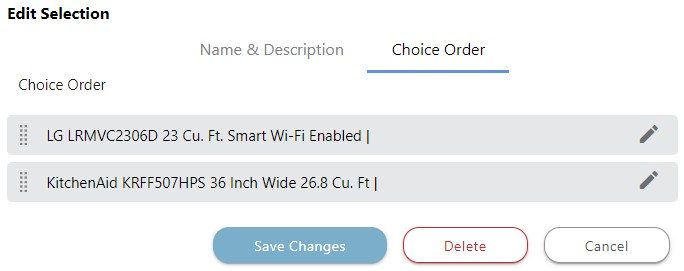
- Choice Order: Drag-n-drop the Selection's respective Choices to update the order in which they appear within the Selection
- Choices within this Selection can be edited in this tab by selecting the pencil icon.
- Selection Order can also be managed when editing Client Selection Categories.

- Finalize your edits by clicking the blue "Save Changes" button. Any changes made to the Selection Details will update within Client Selections automatically.
Looking to edit Client Selections Categories and/or Selection Choices as well? Client Selections Categories and Selection Choices can edited through similar steps by following the links provided here.
ADDITIONAL INFORMATION
- Permissions: Only ConstructionOnline™ Company Users with “Can Create, Edit, & Delete” permissions can edit Selections.
- ClientLink™ and TeamLink™ Users cannot edit existing Categories, Selections, or Choices; however depending upon the ConstructionOnline™ Company's ClientLink™ / TeamLink™ Settings, they may have permission to view, approve, and/or create Selection Choices.
- Mobile App: Existing Categories, Selections, and Choices can be edited within the ConstructionOnline™ Mobile App.
HAVE MORE QUESTIONS?
- Frequently asked questions (FAQ) about Client Selections can be found in the article FAQ: Client Selections.
- If you need additional assistance, chat with a Specialist by clicking the orange Chat icon located in the bottom left corner or visit the UDA support page for additional options.