Create a Subtask for a To Do
Add any additional tasks, requirements, improvements, details, and/or resources to your ConstructionOnline To Dos with Subtasks
BACKGROUND
Essential to maintaining timeliness and attention to detail, ConstructionOnline's To Do Lists software provides construction companies with the tools they need to build & manage detailed construction to do lists at any time, from any place. To support the high level of detail often needed when managing construction projects, ConstructionOnline™ To Do Lists were designed to store all of the comprehensive data related to task lists. Subtasks play a crucial role in this system, enabling companies to break down To Dos into manageable parts or share the workload among team members. Subtasks function like independent tasks, containing most of the same fields as their parent task, while being embedded within it.
This article contains the following sections:
- Prerequisites
- Video walkthrough
- Step-by-step instructions
- Best use recommendations
- Additional information
PREREQUISITES
- A To Do, or "parent task", must be created before Subtasks can be added to it.
VIDEO WALKTHROUGH
STEPS TO CREATE A SUBTASK FOR A TO DO
- Navigate to the desired Project via the Left Sidebar.
- Select the Project Tracking tab to automatically open the To Do Lists category.
- Within the To Dos pane in List View, locate the To Do you wish to add a Subtask to.
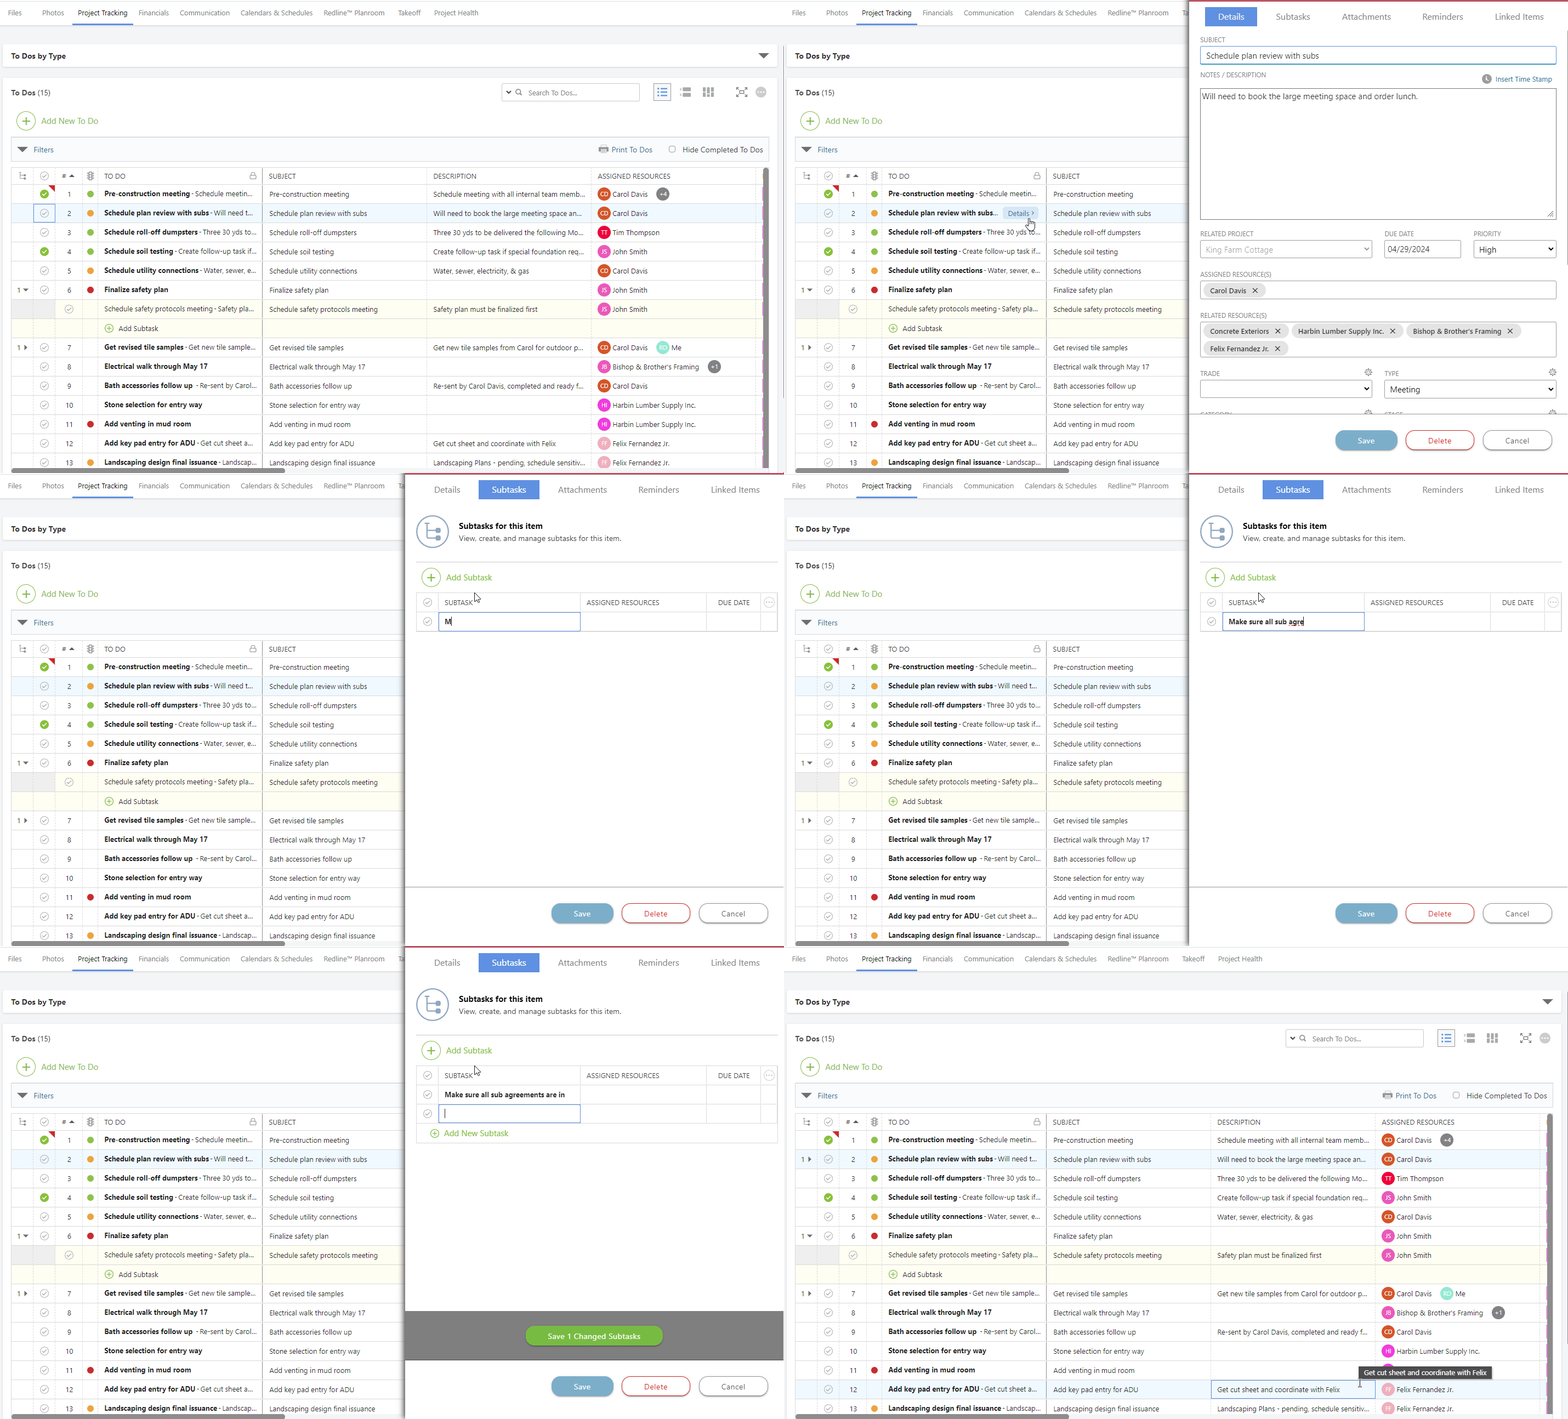
- Right-click on the To Do, and select "Subtasks" from the dropdown menu. ConstructionOnline will populate a new row/additional level of detail under the selected task.
- Begin typing in the details of your Subtask. In order for the Subtask to save, it must at least have a Subject; however, most of the same fields available when creating a parent task are available for Subtasks including:
- Details:
- Subject - Briefly describe or title the task or item that needs to be completed
- This field is required.
- Notes/Description - Provide any additional details about the task in this multi-line text entry field
- Assigned Resource(s) - Assign the Company Contact(s) that are responsible for completing the task by beginning to type the desired name into the field
- Resources that populate here are pulled from your ConstructionOnline Company Contact List. New Contacts must be added through the Company Contacts page and cannot be added when creating a To Do.
- Due Date - Set a deadline for completing the task
- Related Resource(s) - Add any additional Company Contact(s) you wish to be associated with the task by beginning to type the desired name into the field
- Resources that populate here are pulled from your ConstructionOnline Company Contact List. New Contacts must be added through the Company Contacts page and cannot be added when creating a To Do.
- Priority - Assign one of the following Priority levels to the task
- None
- Low
- Medium
- High
- Trade - Select a Trade to attach to the task
- This field can be customized.
- Type - Specify the Type of task this task is (i.e. a phone call, meeting, jobsite task, etc.)
- This field can be customized.
- Category - Classify the task's Category (i.e. an administrative task, preconstruction task, closeout task, etc.)
- This field can be customized.
- Stage - Indicate the status or stage in which the task stands
- This field can be customized.
- Tags - Attach any relevant Tags to the task
- Traffic Light - Assign one of the following colors to the Traffic Light indicator
- None
- Green
- Yellow
- Red
- Cost Code - Choose the desired Cost Code for the task
- Cost Codes must be assigned to the Project to populate here.
- Cost Impact - Indicate the dollar amount in which this task may effect the overall project cost
- If this has yet to be determined, mark the checkbox next to ☑️ To Be Determined
- Created By - This field cannot be edited. ConstructionOnline will automatically populate this field to reflect the user who created the Subtask upon creation.
- Percent Complete - Enter the percentage of work associated with the task that has been completed, if applicable
- Completed Date - Record the actual date the task was wholly finished, if applicable. Otherwise, ConstructionOnline will automatically populate the Completed Date once the task is marked as "Complete", or this field can be manually updated at any other point.
- Subject - Briefly describe or title the task or item that needs to be completed
- Details:
- ConstructionOnline automatically saves your data as your enter it on to any dynamic table—including the one available in To Do's List and Group By Views.
⭐Need a change of scenery? ConstructionOnline's advanced blade extension provides you with further editing and customization capabilities without forcing you to navigate away from your task list. If you wish to enter your Subtask details from the blade extension, hover over the task you wish to add a Subtask to, click the blue "Details" tab to expand the blade, choose the "Subtasks" tab, and fill in your information.

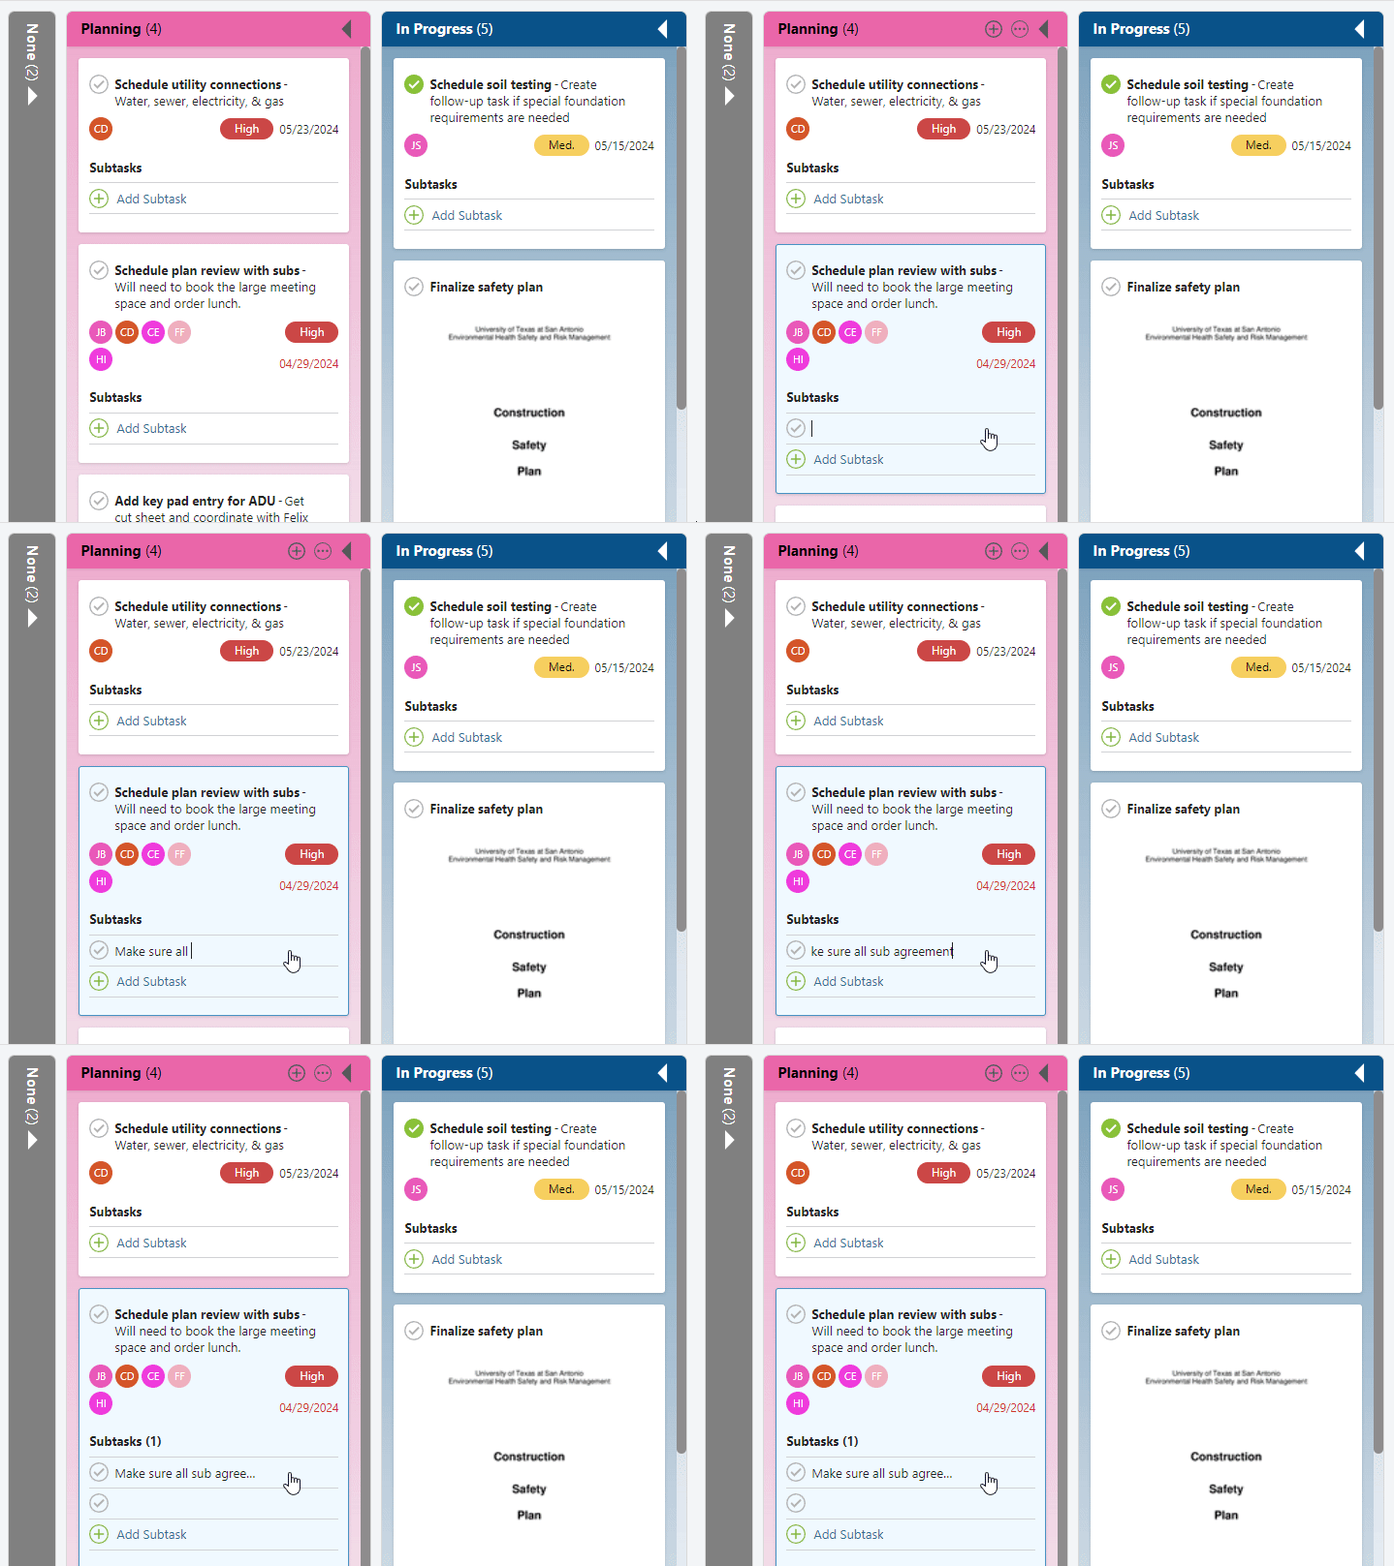
⭐Subtasks can also be created directly on To Do cards in Board View by clicking on the (+) Add Subtask option within any existing To Do.

BEST USE
Subtasks for ConstructionOnline's To Do Lists allow your company to increase accountability and track progress more effectively by, for example, breaking up the work of a task into smaller parts or dividing up the work associated with a task among multiple people. While there are endless options for how your team can utilize Subtasks in ConstructionOnline, we specifically recommend creating To Dos & Subtasks for lists you wish to associate with OnPlan™ Schedule Tasks.
Powered by SmartLink™—ConstructionOnline's innovative technology engineered to further integrate all of the moving parts of construction project management—Company and/or Project To Do Lists (and their respective Subtasks) can be linked to OnPlan Schedule Groups or Tasks through the "Linked Items" tab within a To Do's Details. The ability to link these two separate, but connected, items within ConstructionOnline allows you to quickly reference completion statuses, see what tasks are overdue, assign resources, and more from within BOTH features. These benefits not only ensure that all of the pieces of your project stay connected, but can also save your company critical time, money, and resources.
To learn how to link a To Do to a Schedule Task from within the To Dos feature, visit this FAQ.
To learn how to link a Schedule Task to a To Do within OnPlan Scheduling, visit this FAQ.
ADDITIONAL INFORMATION
- Subtasks inherit the Related Project or Project Template (if applicable) and Privacy settings of their parent task.
- Subtasks cannot contain Attachments; however, any documents associated with the Subtask can be uploaded as an Attachment to the parent task.
- Subtasks cannot be linked to Schedule Tasks via ConstructionOnline's SmartLink Technology.
- Reminders cannot be set for Subtasks exclusively.
- To Dos & Subtasks can be created at the Company or Project level. Step-by-step instructions for creating Company To Dos can be found in this FAQ!
- Permissions: ConstructionOnline Company Users must have To Do Lists permissions set to "Can Create, Edit, & Delete" to create new Subtasks for To Dos.
- Additionally, any Company User added as an Assigned Resource to a To Do can add Subtasks to that To Do, despite their To Do Lists permissions.
- ClientLink™/TeamLink™ Access: In addition to global ClientLink/TeamLink permissions for To Do Lists, ClientLink and TeamLink Users must also be added as an Assigned Resource in order to be able to add Subtasks to their assigned To Dos.
HAVE MORE QUESTIONS?
- Frequently asked questions (FAQ) regarding To Dos can be found in the FAQ: To Dos article.
- If you need additional assistance, chat with a Specialist by clicking the orange Chat icon located in the bottom left corner or visit the UDA support page for additional options.