BACKGROUND
ConstructionOnline's OnCost™ Estimating offers a user-friendly online interface where Company Users can easily & efficiently build comprehensive construction estimates to track project costs, margins, profits, and more. With two convenient ways to add new Categories, Subcategories, or Items, ConstructionOnline™ Company Users can customize and detail their construction estimates through whatever system works best for them and their processes.
STEPS TO ADD A NEW ESTIMATE CATEGORY, SUBCATEGORY, OR ITEM
- Navigate to the desired Project via the Left Sidebar.
- Click the Financials tab to automatically open the Estimating category.
- Find the green "(+) Add ______" row or cell in the location you wish to add a new Category, Subcategory, or Item
- Click the green "(+) Add ______" row or cell. The new Category, Subcategory, or Item will populate within the Estimate immediately and be saved automatically.
- Categories can only be inserted within the Project Totals sheet.

- Subcategories can be inserted from both Project Totals sheets and individual Category sheets.

- Items can only be inserted within individual Category sheets.

♦ NOTE: By default, all ConstructionOnline™ OnCost™ Estimates have the Show Add Links setting engaged within Estimate Settings.
If the green (+) Add Links do not appear within your current OnCost™ Estimate, you can engage these options within Estimate Settings. - Adding new Categories, Subcategories, and Items inserts a placeholder cell for the respective Category, Subcategory, or Item. Category, Subcategory, and Item Details must then be added/edited to customize the entry for the Estimate.
- Any newly created Category, Subcategory, or Item can be easily removed from the Estimate by deletion.
- Categories can only be inserted within the Project Totals sheet.
ALTERNATIVE ACCESS POINT
- Categories, Subcategories, and Items can also be inserted using the Estimating Toolbar. To access the insert functions from the Estimating Toolbar, open the Estimate you wish to add a new Category, Subcategory, or Item to, then:
- Open the Estimating Toolbar by clicking the brick icon at the top right of the Estimate

- Within the New tab and click the "Insert ______" option depending on whether you wish to add a Category, Subcategory, or Item.
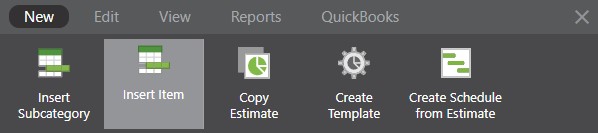
- The Estimating Toolbar is responsive to the current Estimate sheet. Within the Project Totals sheet, only options for inserting Categories or Subcategories will be available. Within individual sheets, only options for inserting Subcategories or Items will be available.
- Different Estimate Types (3-level vs. 2-level) will also have different actions available within the Estimating Toolbar.
- For example: Inserting a new Item will not be an Estimate Toolbar option within legacy 2-Level Estimates as they are restricted to Categories and Subcategories.
- The new Category, Subcategory, or Item will populate within the Estimate immediately.
- Open the Estimating Toolbar by clicking the brick icon at the top right of the Estimate
ADDITIONAL INFORMATION
- New Categories, Subcategories, and Line Items can be added within all 3-Level OnCost™ Estimates in ConstructionOnline™ - including Opportunity Estimates & Estimate Templates .
- 2-Level Estimates are restricted to Categories and Subcategories only.
- Permissions: Only ConstructionOnline™ Company Users with Estimating permissions set to “Can Create, Edit, & Delete” can add new Categories, Subcategories, and/or Items to an Estimate.
- Mobile App: Inserting Categories, Subcategories, and Items into an Estimate is available through browser access to ConstructionOnline™ only. Estimates are presented in View-Only Mode on the ConstructionOnline™ Mobile App.
HAVE MORE QUESTIONS?
- Frequently asked questions (FAQ) regarding OnCost Estimating can be found in the FAQ: Estimating article.
- If you need additional assistance, chat with a Specialist by clicking the orange Chat icon located in the bottom left corner or visit the UDA support page for additional options.