Is Socket limited to certain devices?
What are the recommended Socket settings?
How can I prepare QuickBooks Desktop for integration with ConstructionOnline?
Can I integrate with multiple QuickBooks Desktop companies?
Does the integration affect my QuickBooks Chart of Accounts?
What kind of QuickBooks Desktop accounts can I link to?
Why do I need to have a ClientLink Contact for the QuickBooks Desktop integration?
What client information is sent to QuickBooks Desktop?
What automatically populates in QuickBooks Desktop once I am integrated?
How can I set up my estimates to integrate with QuickBooks Desktop?
Is there a recommended estimate structure for the QuickBooks Desktop integration?
How can I import my QuickBooks Desktop Items List into ConstructionOnline?
How can I map/link my estimate to QuickBooks Desktop?
What OnCost Estimates columns send over to QuickBooks Desktop?
Why is the Item Name in QuickBooks Desktop shorter than the name in ConstructionOnline?
Why do I have a bunch of extra Items/Accounts in QuickBooks Desktop?
Can I create Applications for Payment documents?
How do I create an Application for Payment in Socket?
How can I import data from QuickBooks Desktop into ConstructionOnline?
How often should I import values from QuickBooks Desktop?
Can I automatically import data from QuickBooks Desktop?
How can I create new Batch Imports?
Why did my Batch Import not import data?
What support resources are available to me through the QuickBooks Desktop integration?
ConstructionOnline + QuickBooks Desktop Key Terminology
What is Socket?
Socket is an external application engineered by UDA to facilitate the transfer of data between ConstructionOnline and industry-leading desktop systems like QuickBooks Desktop and PlanSwift. Socket can be downloaded onto any Windows device, but should be installed on the same computer as your QuickBooks software in order to be able to successfully integrate. To learn more about Socket, visit this article!
Is Socket limited to certain devices?
Yes, Socket is exclusively available for Windows devices.
How can I download Socket?
Socket can be downloaded to your Windows device by using the following instructions:
- Navigate to the Company Dropdown Menu located in the top right corner of ConstructionOnline.
- Within the Financial Settings category, choose "QuickBooks Integration".
- From the "Choose QuickBooks Integration Method" window, locate the text at the bottom of the window that reads "If you need to download Socket to your computer, click here."
- Click on the blue "click here" text next to this message to initiate the download.
- Upon completion, Socket Setup will be available in the Downloads section of the web browser in use.
What are the recommended Socket settings?
Socket settings are really dependent on what your company wants to achieve with your ConstructionOnline + QuickBooks Desktop integration. You can find the settings we typically recommend for Socket in the QuickBooks Desktop Initial Setup article. However, if you have questions about your Socket settings or your QuickBooks Desktop integration, we highly recommend scheduling a one-on-one training session with one of our ConstructionOnline Product Specialists. With a one-on-one training session, you can discuss your business' unique goals with one of our training experts to ensure your needs are being met. All ConstructionOnline subscriptions allow for unlimited training free of charge to all ConstructionOnline Users.
How can I prepare QuickBooks Desktop for integration with ConstructionOnline?
The most important way you can prepare QuickBooks Desktop for integration with ConstructionOnline is to ensure your estimate structure and QuickBooks Items List reflect one another. This will ensure Socket's auto-mapping feature can successfully match your OnCost Estimate data with the corresponding items in QuickBooks Desktop, streamlining your workflow and reducing the risk of errors.
To learn more about auto-mapping, visit this FAQ.
Can I integrate with multiple QuickBooks Desktop companies?
Yes, ConstructionOnline's QuickBooks Desktop integration is extremely flexible and is programmed to integrate with whatever QuickBooks Desktop Company you have open.
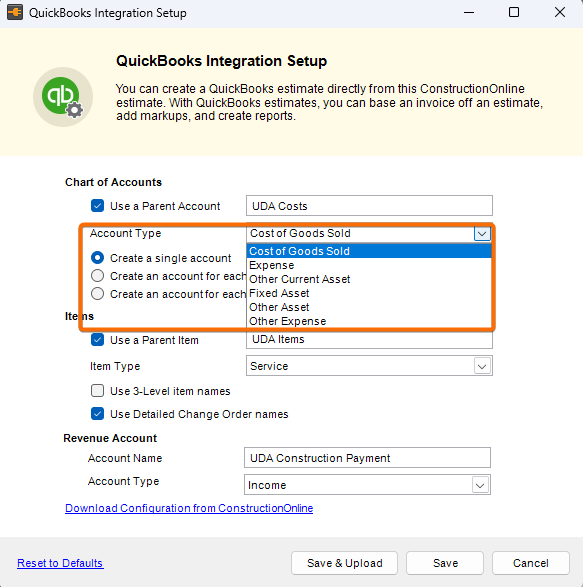
Does the integration affect my QuickBooks Chart of Accounts?
Your QuickBooks Chart of Accounts serves as a foundation for your business' financial reporting in QuickBooks Desktop, not the integration with ConstructionOnline. However, your Chart of Accounts will be impacted by your integration with ConstructionOnline. Configuration of your Chart of Accounts is set up during the initial ConstructionOnline + QuickBooks Desktop Integration set up, but can be manually adjusted at any time.
More information on this can be found in the ConstructionOnline + QuickBooks Desktop Integration Guide.
What kind of QuickBooks Desktop accounts can I link to?
With ConstructionOnline's QuickBooks Desktop integration, you can link to the following Account Types: Cost of Goods Sold (COGS), Expense, Other Current Asset, Fixed Asset, Other Asset, or Other Expense. The COGS Account Type is the most common option selected; however, we recommend consulting with your accountant to verify for your company.
Why do I need to have a ClientLink Contact for the QuickBooks Desktop integration?
ClientLink Contacts must be assigned within any ConstructionOnline Project you are connecting with QuickBooks Desktop as the ClientLink Contact serves as the QuickBooks Customer for the job. Assigning a QuickBooks Desktop Customer must be done in order to fully activate a project's accounting integration. More on assigning a QuickBooks Customer can be found here.
What client information is sent to QuickBooks Desktop?
The Name, Email, Street Address, and Phone Number attached to your Project's ClientLink User are sent to QuickBooks Desktop.
What automatically populates in QuickBooks Desktop once I am integrated?
Once you've activated the connection between ConstructionOnline and QuickBooks Desktop, you can begin sending & receiving your project financials between ConstructionOnline and QuickBooks Desktop. To ensure you have complete control over what information is shared and how it's formatted so that only relevant data is being transferred, financial data must be manually pushed from ConstructionOnline.
However, upon the creation and transfer of data, Socket does automatically create a Customer and Job in QuickBooks Desktop as well as match your estimate data with corresponding items in QuickBooks. If there are no matches, Socket will create matching data in QuickBooks Desktop based on your settings. This is why it's important to ensure your estimate structure and QuickBooks Items List reflect one another before initiating the transfer of data!
How can I set up my estimates to integrate with QuickBooks Desktop?
If you have questions about or are unsure how to set up your estimates to be successfully integrated with QuickBooks Desktop, we highly recommend scheduling a one-on-one training session with one of our ConstructionOnline Product Specialists. With a one-on-one training session, you can discuss your business' unique needs with one of our training experts as well as be guided through your ConstructionOnline + QuickBooks integration to ensure its success. All ConstructionOnline subscriptions allow for unlimited training free of charge to all ConstructionOnline Users.
Is there a recommended estimate structure for the QuickBooks Desktop integration?
Yes! When integrating with QuickBooks Desktop, we recommend choosing the Standard Estimate Level (3-Level) and 5-Column Calculation Method.
However, if you have questions about or are unsure how to set up your estimates to be successfully integrated with QuickBooks Desktop, we highly recommend scheduling a one-on-one training session with one of our ConstructionOnline Product Specialists. With a one-on-one training session, you can discuss your business' unique needs with one of our training experts as well as be guided through your ConstructionOnline + QuickBooks integration to ensure its success. All ConstructionOnline subscriptions allow for unlimited training free of charge to all ConstructionOnline Users.
How can I import my QuickBooks Desktop Items List into ConstructionOnline?
ConstructionOnline provides a special Estimate Template that can be used to import your QuickBooks Desktop Items List into ConstructionOnline. The Estimate Template can be downloaded here.
Once you've downloaded the QuickBooks Item List Import Estimate Template, review the ReadMe sheet to determine how your information should formatted for upload to ConstructionOnline. In order for your data to import properly, the Column Names must be correct. The Name columns is the only required field.
Once you've formatted your QuickBooks Items List into the Excel Estimate Template, use the step-by-step instructions found here to import the list into your OnCost Estimate.
How can I map/link my estimate to QuickBooks Desktop?
ConstructionOnline, via its external application Socket and your integration settings, auto-maps/automatically links the Name Column in your Estimate to your Items list in QuickBooks Desktop to streamline the integration and reduce your workload. If no matches are found, Socket will create new Items in QuickBooks to reflect the Items present in your Estimate. This is why it is crucial to ensure your Estimate and QuickBooks Desktop Items Lists reflect one another so that the integration can run seamlessly!
What OnCost Estimates columns send over to QuickBooks Desktop?
The following OnCost Estimate columns are sent to QuickBooks Desktop through ConstructionOnline's accounting integration:
- Name column for Categories and Subcategories (and Items if enabled)
- Base Cost
- Tax (if applied to lines in the estimate; this option cannot be enabled or disabled)
- Company Overhead & Margin (if selected during the creation process; can be prorated into each line item)
- Line Item Markups (if selected during the creation process)
Why is the Item Name in QuickBooks Desktop shorter than the name in ConstructionOnline?
QuickBooks Desktop has character limits in place for each field. The maximum characters allowed for the Item Name in QuickBooks Desktop is 31. If your Item Name in ConstructionOnline exceeds this character limit, it will appear shorter in your QuickBooks Desktop account.
More information on QuickBooks Desktop character limits can be found in this file.
Why do I have a bunch of extra Items/Accounts in QuickBooks Desktop?
Most likely, the reason you have extra Items and/or Accounts in QuickBooks Desktop is due to your OnCost Estimate not matching the existing Items/Accounts you had in QuickBooks Desktop. When Socket cannot find existing Items/Accounts in QuickBooks Desktop to match what is in your OnCost Estimate, it will automatically create new Items/Accounts based off the Estimate, which can result in seemingly erroneous Items/Accounts in QuickBooks.
If you find that this has happened, we recommend manually deleting any extra Items/Accounts that were created, ensuring your Estimate Items match those in QuickBooks Desktop, and then re-initiating the estimate creation in QuickBooks.
Can I create Applications for Payment documents?
Yes! Application for Payment AIA G702 & G703 forms can be generated via Socket as a part of ConstructionOnline's QuickBooks Desktop integration. To learn how to create new Applications for Payment in Socket, visit this FAQ.
How do I create an Application for Payment in Socket?
You can create new Application for Payment forms and corresponding continuation sheets using the following instructions:
- Open the Socket application and log in using your ConstructionOnline username and password.
- Select the desired Project from the Left Sidebar.
- Once you've navigated to the desired Project, choose the "Application for Payment" tab.
- Within the "Application for Payment" tab, locate and click the "AFP Wizard" option located underneath the green "Application for Payment" banner.
- This will open the "Application for Payment" wizard where you can begin creating your new application by entering the following application and project information:
- Application Number: This field is automatically generated based on the number of Applications previously created and cannot be changed.
- Period To: Enter the end date of the period for which the work or services are being billed in the current payment application.
- Contract Date: Enter the date by which the original contract for the project was signed or executed.
- Once you've filled in the appropriate details click the "Next>" button.
- Within the next step, select which QuickBooks Invoice(s) to include in the Application for Payment by marking the checkbox ☑️ next to the desired Invoice(s).
- Invoice(s) must have been previously created in QuickBooks to appear within the table.
- Any Invoice(s) that have been included on previous Applications will not appear within the table.
- Once you've selected the desired Invoice(s), click the "Next>" button.
- Within the next step, select which Change Orders to include in the Application for Payment by marking the checkbox ☑️ next to the desired Change Order.
- Change Orders must have been previously created in QuickBooks to appear within the table.
- Any Change Orders that have been included on previous Applications will not appear within the table.
- Once you've selected the desired Change Orders, click the "Finish" button to generate the Application and Certificate of Payment along with the Continuation Sheet.
- Once generated, the Application for Payment Summary will appear for your review and approval. There are a few different options you can select within this step:
- View Certificate Details: Certificate Details can be viewed by clicking the blue hyperlinked "View Certificate Details" text in the bottom left corner of the wizard.
- View Certificate: The Certificate can be viewed by clicking the "View Certificate" button. Socket will prompt you to review additional required information for the application including Customer Name & Address, Contractor Name & Address, Project Name & Address, and Architect Name & Address.
- Once you've reviewed and approved these details, click the "Continue" button. Socket will automatically download & open the Application & Certificate Payment and Continuation Sheet documents in Excel.
- Save to ConstructionOnline: The Application for Payment can be saved to your ConstructionOnline account by clicking the "Save to ConstructionOnline" button. Socket will prompt you to review additional required information for the application including Customer Name & Address, Contractor Name & Address, Project Name & Address, and Architect Name & Address.
- Once you've reviewed and approved these details, click the "Continue" button. Socket will automatically upload the Application for Payment within an "Application for Payment" file in the respective ConstructionOnline Project's Files.
- Approve: Selecting the "Approve" option signifies the application has been approved.
- All Pending Applications must be approved or deleted before new Applications can be generated.
- Delete: Selecting the "Delete" option deletes the current Application.
- Close: Selecting the "Close" option closes the Application for Payment wizard and saves the Application as "Pending".
- We highly recommending saving all Applications for Payment and corresponding documents to both your ConstructionOnline account and your local device to ensure information is safe, secure, and accessible.
How can I import data from QuickBooks Desktop into ConstructionOnline?
Data can be imported from QuickBooks Desktop into ConstructionOnline two ways:
- Batch Imports - Regularly-scheduled, automatic imports of data based on configured settings
- Manual Import - Manually import data from QuickBooks into ConstructionOnline via Socket using the following instructions
- Open the Socket application and log in using your ConstructionOnline username and password.
- Select the desired Project from the Left Sidebar.
- Once you've navigated to the desired Project, choose the "QuickBooks" tab.
- Within the "QuickBooks" tab, locate and click the "Import from QuickBooks" option located underneath the green "Accounting Information" banner.
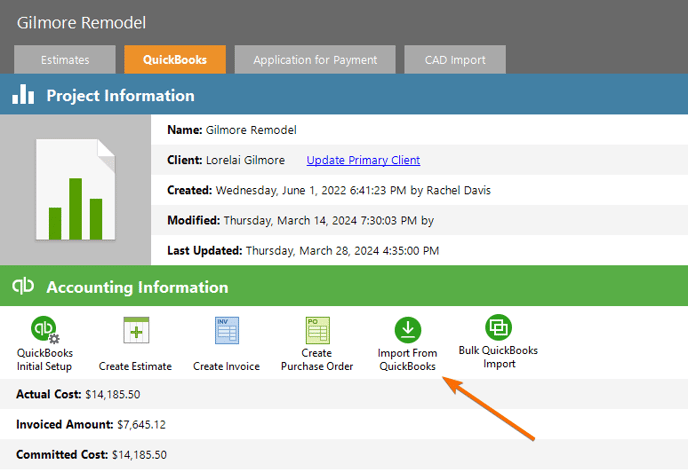
- From the dropdown menu, choose from the following options:
- Import Actuals - The following options are selected/deselected by default but can be modified. To engage any sub-options, click to deselect & reselect the parent option.
☑️ Include Checks
🔵 All Checks
⚪ Only Printed Checks
⚪ Only Unprinted Checks
☑️ Include Bills
🔵 All Bills
⚪ Only Paid Bills
⚪ Only Unpaid Bills
☑️ Include Credit Card Charges
☑️ Include Paychecks
⬜ Generate a Custom Transaction Report in QuickBooks
- Import Committed Costs - The following options are selected/deselected by default but can be modified. To engage any sub-options, the parent option must be selected.
☑️ All Purchase Orders
⚪ Open Purchase Orders
⬜ Include Partially Unreceived Quantity
⚪ Closed Purchase Orders
⬜ Include Partially Received Quantity - Import Invoiced Values - The following options are selected/deselected by default but can be modified.
🔵 All Invoices
⚪ Only Paid Invoices
⚪ Only Unpaid Invoices - Import All Values - This option imports Actual Costs, Committed Costs, and Invoiced Amounts from QuickBooks at the same time and will overwrite all current QuickBooks values in the estimate.
☑️ Import Actuals
☑️ Include Checks
🔵 All Checks
⚪ Only Printed Checks
⚪ Only Unprinted Checks
☑️ Include Bills
🔵 All Bills
⚪ Only Paid Bills
⚪ Only Unpaid Bills
☑️ Include Credit Card Charges
☑️ Include Paychecks
☑️ Import Invoices
🔵 All Invoices
⚪ Only Paid Invoices
⚪ Only Unpaid Invoices
☑️ Import Purchase Orders
🔵 All Purchase Orders
⚪ Open Purchase Orders
⬜ Include Partially Unreceived Quantity
⚪ Closed Purchase Orders
⬜ Include Partially Received Quantity - If you'd like to receive email notifications once the batch is complete, click the "Import Options" hyperlinked text in the bottom right-hand corner of the window and enter the desired email address(es) in the text field. Multiple email addresses can be entered in the field, but must be separated with commas.
- Import Actuals - The following options are selected/deselected by default but can be modified. To engage any sub-options, click to deselect & reselect the parent option.
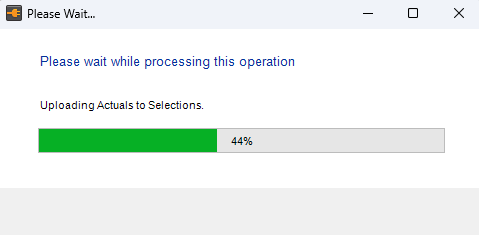
- Once you've finalized the details of your import, click the "OK" button. A progress bar will appear while data is being uploaded.
- Upon completion, the selected data will appear in ConstructionOnline. To learn more about where to find QuickBooks data in ConstructionOnline, visit this FAQ.
- You can also view what Actuals, Invoiced, and Committed values have been imported within the QuickBooks tab in Socket.
How often should I import values from QuickBooks Desktop?
This is really dependent on your preferences and your company's processes. We recommend importing values into ConstructionOnline any time you want your data in ConstructionOnline to reflect what you have in QuickBooks. This could be any time you create a transaction, at the end of every business day, whenever your company processes billing—it's up to you! However we do recommend having a consistent and timely schedule for your imports so that your financial data stays up-to-date and accurate.
One way ConstructionOnline can streamline and automate this process is through the Batch Import option. With the QuickBooks Batch Import option available through Socket, you can set up regularly-scheduled Batch Imports from QuickBooks Desktop into ConstructionOnline at intervals that fit your company's needs. To learn more about Batch Imports, visit this FAQ.
Can I automatically import data from QuickBooks Desktop?
Yes! With the QuickBooks Batch Import option available through Socket, you can set up regularly-scheduled batch imports from QuickBooks Desktop into ConstructionOnline. To learn how to set up Batch Imports in Socket, visit this FAQ.
How can I create new Batch Imports?
New Batch Imports can be created using the following instructions:
- Open the Socket application and log in using your ConstructionOnline username and password.
- From the Left Sidebar, choose the "QuickBooks Batch Import" category.
- This will open the QuickBooks Batch Operations window.
- If no Batch Imports exist, click the "Click here to create a new QuickBooks Batch Import" hyperlinked text.
- If you have existing Batch Imports, click the (+) Create Batch option at the bottom of the screen.
- Once within the "New QuickBooks Batch Import" window, choose the Projects and QuickBooks values that will be included by selecting from the following options:
- Batch Name: Automatically populates to "Batch Import" if no other batches exist and "Batch Import [subsequent number]" if other batches exist; this field can be manually modified
- Included Projects: Choose to include All Active Projects in the batch or Select Projects
- If choosing the "Selected Projects" option you must click the "Select" button and choose which Projects you would like to include in the batch.
- Projects in the list can be sorted alphabetically or by Type, Office, Group, Stage, Category, Division, or Region for streamlined search.
- Then, choose from the following QuickBooks values options:
☑️ Import Actuals
☑️ Include Checks
🔵 All Checks
⚪ Only Printed Checks
⚪ Only Unprinted Checks
☑️ Include Bills
🔵 All Bills
⚪ Only Paid Bills
⚪ Only Unpaid Bills
☑️ Include Credit Card Charges
☑️ Include Paychecks
☑️ Import Invoices
🔵 All Invoices
⚪ Only Paid Invoices
⚪ Only Unpaid Invoices
☑️ Import Purchase Orders
🔵 All Purchase Orders
⚪ Open Purchase Orders
⬜ Include Partially Unreceived Quantity
⚪ Closed Purchase Orders
⬜ Include Partially Received Quantity - If you'd like to receive email notifications once the batch is complete, click the "Import Options" hyperlinked text in the bottom right-hand corner of the window and enter the desired email address(es) in the text field. Multiple email addresses can be entered in the field, but must be separated with commas.
- Once you have finalized the batch's details, click the "OK" button.
- The new Batch will appear within the QuickBooks Batch Operations table. Within the table, click the "configure schedule" text within the Recurrence column next to the Batch you just created.
- This will open the "QuickBooks Batch Import Run Settings" window where you can choose the day(s) and time your Batch Import will run.
🚩 Please note that QuickBooks Desktop and Socket must be open & running on a computer that is ON (not asleep) for the batch to process correctly.
- Socket provides the following Batch Import Day & Time Run Settings option:
- Date to Run:
- Never
- Sundays
- Mondays
- Tuesdays
- Wednesdays
- Thursdays
- Fridays
- Saturdays
- Daily
- Daily (Weekdays Only)
- Time to Run: Choose any top of the hour option for the batch to run.
- Please note that in order to reduce issues with multiple users interacting with QuickBooks, we recommend scheduling all activity outside of your regular business hours.
- Date to Run:
- Socket provides the following Batch Import Day & Time Run Settings option:
- Once you've selected the desired settings, click the "OK" button.
- The settings you selected will appear within the Recurrence column.
Tips & Tricks: Access the following options by clicking the gear icon ⚙️ located next to the desired batch:
- Edit Batch Properties - Please note that any edits made only apply to future Batch Imports.
- Batch Recurrence - Takes you to the Batch Import Day & Time Run Settings
- Disable Batch - Turns off scheduled syncs for the batch but keeps all of the configuration data
- Delete Batch - Please note batches that are deleted from Socket cannot be recovered and must be re-created.
- Run Batch - Manual option for running the Batch Import. This can also be done by clicking the green ▶️ "play" icon next to the desired Batch.
- View Batch Report - Generate full batch history report for the respective batch
- Options - Allows you to add and/or edit email address(es) you wish to send email notifications to upon batch completion. Multiple email addresses can be entered within the text field but must be separated by commas.
Why did my Batch Import not import data?
There are a few of reasons why your Batch Import may not have imported any new data into ConstructionOnline:
- Both the QuickBooks Desktop and Socket applications were not open and running on your computer.
- The computer in which both QuickBooks Desktop and Socket applications were open was not turned on or had fallen asleep.
- There was no new data in QuickBooks Desktop to import into ConstructionOnline.
In the rare instance that your Batch Import still is not running after confirming each of these items to be true, contact our Support Team for additional assistance. Be sure to indicate exactly which steps you’ve already tried so that we can better assist you.
What support resources are available to me through the QuickBooks Desktop integration?
ConstructionOnline's Customer Support Team is here to help! All ConstructionOnline subscriptions allow for unlimited training & support free of charge to all ConstructionOnline Users. You can contact our award-winning support staff using one of the following methods:
- Click the orange Chat icon in the bottom left corner of ConstructionOnline
- Call 800.700.8321
- Email support@uda1.com
Our U.S.-based Support Team is ready to take your chats, calls, and emails any time between 9:00 AM to 6:00 PM ET.
CONSTRUCTIONONLINE + QUICKBOOKS DESKTOP KEY TERMINOLOGY
|
ConstructionOnline |
QuickBooks Desktop |
|
Client |
Customer |
|
Project |
Job |
|
Change Order |
Sub-Job |
|
QB Actuals |
Bills, Checks, Expenses |
|
QB Committed Costs |
Purchase Orders |
|
QB Invoiced Amounts |
Invoices sent to Customer |
- Account: Financial categories where transactions are recorded; examples include Cost of Goods Sold, Expense Accounts, Bank Accounts, Income Accounts, and more
- Bill: Any items or services received that you will pay for at a later date; in ConstructionOnline bills always represent vendor transactions, whether or not you receive an actual bill from the vendor
- Chart of accounts: Complete listing of each account in a business' accounting system; used to track how much money your company has, how much money it owes, how much money is coming in, and how much is going out
- Cost of Goods Sold (aka COGS, Cost of Sales, or COS): The costs associated with producing a good or service
- Customer: The individual or organization purchasing services from your business; each QuickBooks Job must have a Customer in order to accurately track sales, generate invoices, and record payments
- Jobs: Jobs are used in QuickBooks Desktop to track income and expenses for specific projects, tasks, or jobs within your business; they are typically associated with a customer and can help you monitor the profitability and progress of your projects or contracts; jobs allow you to assign transactions (such as invoices or bills) to specific projects, facilitating accurate job cost and reporting
- Item: Product, service, or other charge that your business buys, sells, or uses to track financial transactions; items are used in invoices, sales receipts, purchase orders, and bills to track sales, expenses, and inventory
- When integrating with ConstructionOnline, Socket pulls the Name column for Categories and Subcategories (and Items if enabled), Base Cost, Tax (if applied), Company Overhead & Margin (if selected during the creation process), and Line Item Markups (if selected during the creation process) from your ConstructionOnline Estimate to create Items in QuickBooks.
💡Looking for specific information regarding ConstructionOnline's accounting integrations or integrating with QuickBooks Online? Visit our frequently asked questions (FAQs) articles for ConstructionOnline's Accounting Integrations and QuickBooks Online for direct, concise answers to your common inquires.