BACKGROUND
Known as a hub for construction communication & collaboration, ConstructionOnline™ provides custom Project Portals that allow construction companies to invite clients to access their construction projects through a convenient, custom online login. One integral part of this personalized experience is the ability for ClientLink™ Users to electronically view, approve, and/or create new home selections. To further the level of customization access construction companies are able to offer clients, Company Users are able to set Visibility preferences when managing Client Selections to ensure each client has access to the most relevant selection sheet information for their specific build.
PREREQUISITES
- Selection Choice Visibility is set when adding a new Selection to a Client Selection Category.
- By default, ConstructionOnline™ marks Selections and their respective Choices as "visible" to Clients when adding new Selections. However, the Selection Choice Visibility setting may be altered at any time.
STEPS TO SET SELECTION CHOICE VISIBILITY FOR CLIENTS
- Navigate to the desired Project via the Left Sidebar.
- Select the Financials tab and choose the Client Selections category.
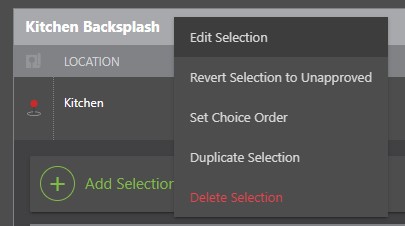
- Within the Selections Details pane, locate the desired Selection.
- Right-click the desired Selection and choose "Edit Selection" from the dropdown menu.
- Within the Edit Selection window, scroll to the bottom of the Name & Description tab to find the Selection Choice Visibility options.
- Choose whether:
- This Selection and its Choices will be visible to clients in the ClientLink™ Portal if they have access to view Selections.
- This Selection and its Choices will not be visible to clients in the ClientLink™ Portal, regardless of their permission settings.
- Once you have designated the Selection Choice Visibility, click the blue "Save Changes" button to finalize your settings.
- If the Selection has already been "Approved," a pop-up message will appear asking you to confirm you would like to revert the Selection's status to "Pending" and notify your clients.
- By clicking "Save and Revert", you will save the edits made to Selection Choice Visibility, revert the Selection to a "Pending" status, and notify your clients the Selection is pending approval.
- Selections that have been marked as "not visible" to clients will populate with a "Not Visible to Clients" tag within ConstructionOnline™
- If the Selection has already been "Approved," a pop-up message will appear asking you to confirm you would like to revert the Selection's status to "Pending" and notify your clients.
ALTERNATIVE ACCESS POINT
- If the Selection is set to "Pending", the Pending Selections pane can be also used to access the Edit Selection option. Use the following steps to manage Selection Choice Visibility through the Pending Selections pane:
- Follow Steps 1 & 2 above.
- Within the Pending Selections pane, right-click on the "Pending" Selection you wish to edit.
- From the dropdown menu, choose "Edit Selection".
- Follow Steps 5-7 above.
ADDITIONAL INFORMATION
-
Permissions: Only ConstructionOnline™ Company Users with “Can Create, Edit, & Delete” permissions can set Selection Choice Visibility.
- ClientLink™ and TeamLink™ Users cannot set the visibility of Selections and their Selection Choices.
- ClientLink™ Users with Client Selections permissions set to "can view Selections and choose from those displayed" are able to view their construction project's Client Selections.
- TeamLink™ Users with Client Selections permissions enabled are able to view Client Selections from the Portal.
-
-
Mobile App: Client Selection Category and/or Choice Descriptions can be added through the ConstructionOnline™ Mobile App.
HAVE MORE QUESTIONS?
- Frequently asked questions (FAQ) about Client Selections can be found in the article FAQ: Client Selections.
- If you need additional assistance, chat with a Specialist by clicking the orange Chat icon located in the bottom left corner or visit the UDA support page for additional options.