BACKGROUND
ConstructionOnline™ provides construction companies with flexible construction management software solutions such as customizable field options––allowing companies to define fields that fit their specific needs, especially as it pertains to the type of work they do, the clients they serve, and how they organize their data.
Custom fields are denoted with a gear icon  and can be used with many different features in ConstructionOnline. One custom field only available for Checklists is the Checklist Item Status field. This field can be used to designate the status of a specific Checklist Item or Item Issue. ConstructionOnline provides construction companies with 5 preloaded Checklist Status values: In Dispute, Work Completed, Closed, Ready, and Open.
This article contains the following sections:
BEST USE
The Checklist Item Status field allows construction companies to better track the status of pending tasks and activities throughout a project. It also gives companies additional filter and reporting options when sharing or printing construction checklists.
Specifically, assigning a Status for each Checklist Item can:
- Ensure each construction checklist is completed on time by reducing the risk of items being forgotten or overlooked
- Improve project team communication by providing real-time updates on construction checklist progress
- Empower better management of your construction checklists overall
STEPS TO MANAGE CHECKLIST ITEM STATUS UNITS
- Navigate to the desired Project via the Left Sidebar.
- Select the Project Tracking tab, then choose the Checklists category.
- Click on any Checklist that contains at least one Checklist Item.
- If the Checklist is stored within a Folder, drill down to the specific Checklist by clicking on & opening the relevant Folder(s).
- Within the Checklist, right-click on any Item and select Edit Item from the dropdown menu.
- Select the gear icon located next to the Status field heading.
- The list of available status units will open in the Checklist Item Statuses window. Within the window:
- New Status Units can be created by clicking the green Add Checklist Item Status + button found in the upper-right corner of the window.
- Existing Status Units can be:
- Deleted by clicking the grey X next to the specific Status Unit
- If you try to delete a Status Unit that is already assigned to a Checklist Item, you will be prompted to "Reassign [the number of places the Status appears] to Another Value Below".
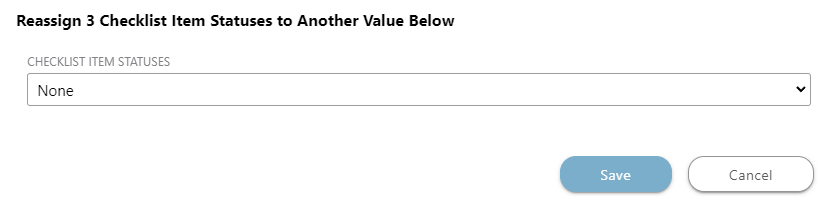
- If you try to delete a Status Unit that is already assigned to a Checklist Item, you will be prompted to "Reassign [the number of places the Status appears] to Another Value Below".
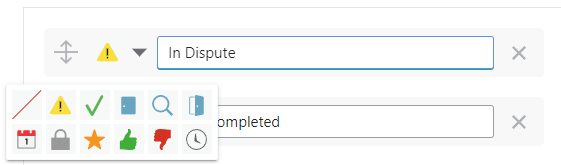
- Renamed by selecting the Status text box and entering the desired name in the field.
- If the Status Unit being renamed has already been assigned to a Checklist Item, the Status will automatically updated to the renamed Status Unit.
- You can also change the icon associated with each Status by clicking on the gray arrow
 located next to the existing icon.
- Rearranged by clicking and dragging the Units up or down the list.
- Deleted by clicking the grey X next to the specific Status Unit
- Finalize your edits to the Checklist Item Status Units list by clicking the blue Save button.
- Checklist Item Status Units are managed on a per Company basis. Any edits to the Status list are applied for all Company Users.
Default Status Units for Checklist Items can be restored at any point by opening the Status window, clicking the "Restore Defaults" text, then clicking the blue Save button. Please note that:
- "Restoring Defaults" restores the default Units that have been deleted.
- Default Checklist Item Status Units that have been renamed will revert to the original name when defaults are restored.
- New Units that have been added to the Item Status Units list will not be removed when restoring the defaults, but they will populate to the bottom of the Item Status Units list.
VIDEO WALKTHROUGH
ADDITIONAL INFORMATION
- Permissions: Any ConstructionOnline Company User is able to manage custom fields, including the Checklist Item Status field.
- The Checklist Item Status field is only available for Checklists.
- Company Users can also manage Checklist Item Status fields from the Edit Item Issue window.
- ClientLink/TeamLink Access: ClientLink™ and TeamLink™ Users cannot manage Checklist Item Status Units.
- Mobile App: Managing Status Units for Checklist Items is exclusively available via browser access to ConstructionOnline.
HAVE MORE QUESTIONS?
- Frequently asked questions (FAQ) regarding Checklists can be found in the FAQ: Checklists article.
- If you need additional assistance, chat with a Specialist by clicking the orange Chat icon located in the bottom left corner or visit the UDA support page for additional options.