BACKGROUND
With industry-leading tools for construction project management, ConstructionOnline™ empowers construction pros & their teams with cloud-based construction checklists that can be used to compile general lists of tasks and sub-tasks that must be completed throughout a project's life cycle.
The flexibility of ConstructionOnline’s cloud-based Checklists allows your team to have access to managing Checklists from anywhere—ensuring your project is completed with clarity and accuracy.
Further visibility for you and your team members can be made available by printing Checklist Reports specific to your needs.
This article contains the following sections:
STEPS TO PRINT A CHECKLIST
ConstructionOnline™ Company Users can access options for printing a Checklist from two convenient locations within Project Tracking:
- From within Checklists:
- Navigate to the desired Project via the Left Sidebar.
- Select the Project Tracking tab and choose the Checklists category.
- Right-click on the Checklist you wish to print, and select "Print Checklist" from the dropdown menu to open the Print Checklist window
.jpg?width=506&name=rightclickprint%20(2).jpg)
- The default options within the Print Checklist window allow you to print the Checklist in its entirety. However, there are multiple customization options that can be applied to print a more focused version of the selected Checklist, including:
- Within the Print Checklist tab:
- Select Project: Choose the Project that contains the Checklist you wish to print
- The current Project is selected by default.
- Select Checklist: Choose the specific Checklist you would like to print
- The previously selected Checklist is selected by default.
- Filter the Checklist by
- Resource: Choose to filter the Checklist by a specific Resource keeping in mind Checklists can only be filtered by one Resource at a time
- Item Priority: Choose to filter the Checklist by Checklist Item Priority set in Checklist Item Details
- Options include: Show All, None, Low, Medium, and High
- "Show All" is selected by default
- Item Status: Choose to filter the Checklist by Checklist Item Status set in Checklist Item Details
- Options include: Show All, None, In Dispute, Work Completed, Closed, Ready, Open, and any Custom Status Units
- "Show All" is selected by default
- Choose what items to include from the Checklist: Using the dropdown menu, select which category of Item completion should be included on the printed Checklist. Options include:
- Incomplete Items and Incomplete Issues
- Incomplete Items and All Issues
- Completed Items
- Completed and Incomplete Issues - This option is selected by default
- Additional Options
- Choose from other customization options by selecting or deselecting the ☑️ check mark beside the corresponding option. Options include:
☑️ Include digital signatures: Displays any signatures already added to the Checklist
☑️ Include blank signature lines: Populates any digitally submitted signatures as well as empty signature lines
- Choose from other customization options by selecting or deselecting the ☑️ check mark beside the corresponding option. Options include:
- Select Project: Choose the Project that contains the Checklist you wish to print
- Within the Default Text tab:
- Choose to insert any Default Text Block into the Checklist. Select from Default Text Blocks already saved to the Company Account, or create new Default Text Blocks directly from within the Print Checklist modal.
- Upper Default Text: Text will appear above the main document content.
- Lower Default Text: Text will appear below the main document content.
- Choose to insert any Default Text Block into the Checklist. Select from Default Text Blocks already saved to the Company Account, or create new Default Text Blocks directly from within the Print Checklist modal.
- Within the Header & Footer tab:
- Default Header & Footer Settings will apply for companies with Pro or Team Plans.
- Companies with Business or Enterprise Plans can choose to apply custom Header & Footer sets to the document.
- Headers & Footers are managed at the Company level.
- To manage Header & Footer sets, click on the Manage Header & Footer Sets hyperlinked text.
- Within the Print Checklist tab:
- Finalize the details of the printed Checklist by clicking the blue "Create" button.
- The Checklist will open in a new browser tab for you to Share (via email), Save (to ConstructionOnline™ Files), Download (as PDF), Edit (in built-in text editor), or Print.
- From within Project Tracking Reports:
- Navigate to the desired Project via the Left Sidebar.
- Select the Project Tracking tab and choose the Project Tracking Reports category.
- Find the Checklist Reports section. Hover over the Print Checklist option until it darkens and click "Create."
- Follow Steps 2d-g above.
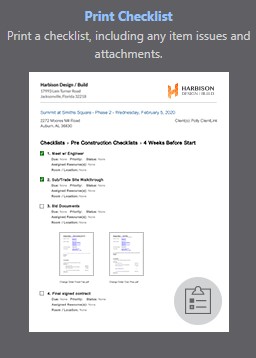
To print the Checklist in its entirety, leave the default settings or select the following Filter options:
- Leave Resource field blank
- Have Item Priority set to “Show All”
- Have Item Status set to “Show All”
- Choose to show Complete and Incomplete Items
VIDEO WALKTHROUGH
ALTERNATIVE ACCESS
- You can also print directly within a Checklist by selecting the "Print Checklist" button located next to the "Hide Completed Items" checkbox.
- Please note this option is only visible if you have drilled down into the specific Checklist you would like to print out.

- Please note this option is only visible if you have drilled down into the specific Checklist you would like to print out.
ADDITIONAL INFORMATION
- Signatures stored digitally in ConstructionOnline™ will print with the Checklist by default.
- Checklists printed from ConstructionOnline™ can include the company's logo or letterhead. Company logo & letterhead preferences can be managed from within the Company Settings and are applied company-wide.
- Permissions: ConstructionOnline™ Company Users must have Checklist Permissions set to “Can View” or "Can Create, Edit, & Delete" to print Checklists.
- ClientLink™ / TeamLink™ Access: ClientLink™ and TeamLink™ Users with Checklists permissions enabled can print out Checklists if they have been added as Checklist Viewers/Editors or as Assigned Resources to specific Checklist Items.
- If a user has not been assigned as a Checklist Editor or Viewer, they will only be able to print out the Checklist Items they have been assigned to.
- Mobile App: Company Reports, including printed Checklists, cannot be created using the ConstructionOnline™ Mobile App. Creation of reports & documents is exclusively accessible via browser access to ConstructionOnline™.
- Reports & documents are otherwise accessible for viewing, sharing, and/or downloading using the ConstructionOnline™ Mobile App.
HAVE MORE QUESTIONS?
- Frequently asked questions (FAQ) regarding Checklists can be found in the FAQ: Checklists article.
- If you need additional assistance, chat with a Specialist by clicking the orange Chat icon located in the bottom left corner or visit the UDA support page for additional options.