BACKGROUND
Proven to improve the attention to detail and quality control of construction projects, ConstructionOnline's Punch List management tool offers construction companies industry-leading software solutions that result in more efficient management of construction jobs.
A vital part of the management of Punch Lists is the ability to remove tasks that no longer need to be completed. ConstructionOnline™ offers the ability to remove Punch Lists, as well as their individual Items and Item Issues, with ease to avoid miscommunications & project delays.
This article contains the following sections:
STEPS TO DELETE A PUNCH LIST ITEM ISSUE
- Navigate to the desired Project via the Left Sidebar.
- Select the Project Tracking tab and choose the Punch Lists category.
- Click on the Punch List you wish to delete an Item Issue from.
- If the Punch List is stored within a Folder, drill down to the specific Punch List by clicking on & opening the relevant Folder(s).
- Within the Punch List, right-click on the Item you wish to remove an Item Issue from and select "Manage Issues" from the dropdown menu.
- From the Item Issues tab, find the Item Issue you wish to remove and click the "X" to the right of the Item Issue.

- Within the Delete Issue window, click the red "Delete" button to confirm.
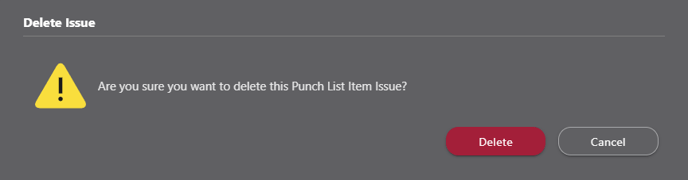
⚠️ Please note: Punch List Item Issues that have been deleted cannot be recovered.
ALTERNATIVE ACCESS POINTS
- Punch List Item Issues can also be deleted from the Item Issues view by using the following steps:
- Follow Steps 1 & 2 above.
- At the top right of the Punch Lists pane, choose the Item Issues view.

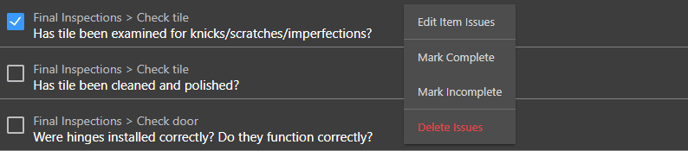
- Hover over the Item Issue you wish to remove from ConstructionOnline™ and click the gray three-dot action menu to the right of the desired Item Issue.
- Choose "Delete Issue" from the dropdown menu.
- Follow Step 6 above.
TIPS & TRICKS
Looking to delete several Punch List Item Issues at once? Save time by using ConstructionOnline's multi-select feature, which allows you to perform bulk-actions on multiple Punch List Item Issues at once.
- To enable multi-select, hold down the Ctrl/Command key on your keyboard. Please use the Ctrl key if using a Windows device and the Command key for a macOS device.
- From the Item Issues view, click on the desired Punch List Item Issues you would like to delete in bulk. Each Item Issue you select will appear highlighted in either blue or dark grey, depending on your display settings.
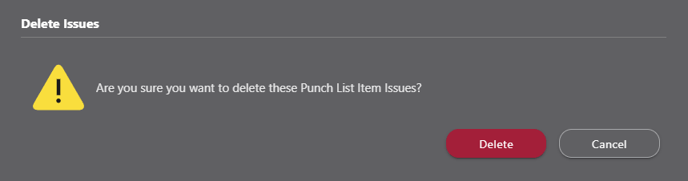
- Release the Ctrl/Command key, then right-click on any selected Item Issue and select the option "Delete Issues".
- Confirm you wish to delete the selected Item Issues by clicking the red "Delete" button.
ADDITIONAL INFORMATION
- Punch List Item Issues deleted from ConstructionOnline™ Projects or Project Templates cannot be recovered.
- Permissions: ConstructionOnline™ Company Users must have Punch Lists permissions set to "Can Create, Edit, & Delete" to delete Punch List Item Issues.
-
- ClientLink™ and TeamLink™ Users with Punch Lists permissions set to "see Punch Lists they're assigned a Viewer on, make changes to Punch Lists they're assigned an Editor on, and make changes to Punch List Items they're an Assigned Resource on" can delete Punch List Item Issues depending on their assigned roles (i.e. Editor and/or Assigned Resource).
- Mobile App: Punch List Item Issues can be deleted from the CO™ Mobile App.
HAVE MORE QUESTIONS?
- Frequently asked questions (FAQ) regarding Punch Lists can be found in the FAQ: Punch Lists article.
- If you need additional assistance, chat with a Specialist by clicking the orange Chat icon located in the bottom left corner or visit the UDA support page for additional options.