BACKGROUND
Communication is one of the great attributes of ConstructionOnline™, and our ClientLink™ and TeamLink™ features are a big part of that. By way of the Portals, your ClientLink™ and TeamLink™ Users are able to view the information relevant to the Projects they have been assigned to. This is the perfect tool for keeping them up to date and informed during every stage of their Projects!
STEPS TO ADD CLIENTLINK™ AND/OR TEAMLINK™ USERS TO PROJECTS
ConstructionOnline™ offers two convenient ways that Company Admins can add ClientLink™ and/or TeamLink™ Contacts to Projects:
A. From the Project:
- Navigate to the desired Project via the Left Sidebar.
- Select the Team tab.

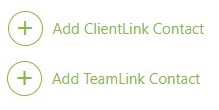
- Click the green + Add ClientLink Contact or + Add TeamLink Contact button depending on the type of Contact(s) you would like to add to the Project.
- Within the Add Contact(s) to Project window, select the Contact(s) you wish to add.
- Users must be added to your Company Contacts to appear within this window.
- Click the green + Add New [ClientLink™ or TeamLink™] Contact button to create a New Contact.
- Users who are already assigned within the Project as Company Administrators, Company Employees, or ClientLink™ / TeamLink™ Users will not appear within the list of options.
- Multiple Contacts can be added to the Project as ClientLink™ / TeamLink™ Users within this window.
- Users must be added to your Company Contacts to appear within this window.
- Once you have selected the Contact(s) you wish to add, click the blue "Save" button to finalize the action.
- The new ClientLink™ / TeamLink™ User will appear within its respective list upon successful addition to the Project.
B. From the Contacts page:
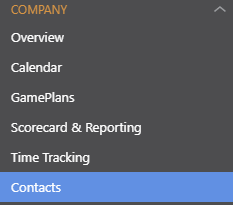
- Navigate to Contacts via the Left Sidebar.
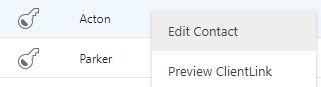
- Within the All Contacts list, right-click on the ClientLink™ / TeamLink™ Contact you wish to add to a Project.
- From the dropdown menu, select "Edit Contact".
- Within the Contact Details window, select the Projects tab.

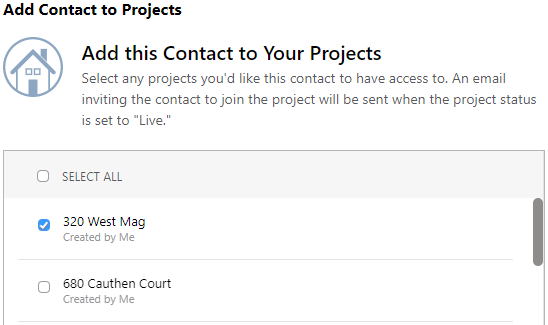
- Click the green + Add Contact to Projects button.

- Within the Add Contacts to Projects window, select any Project(s) you'd like this Contact to have access to.
- An email inviting the Contact to join Project will be sent when the Project Status is set to "Live".
- If the Project is currently set to "Live", the email will be sent immediately.
- If the Project is currently set to "Live", the email will be sent immediately.
- You may also view what other Projects, if any, the Contact has been invited to & the last time the Contact logged into the Portal within this window.
- An email inviting the Contact to join Project will be sent when the Project Status is set to "Live".
- Finalize adding this Contact to the Project by clicking the blue "Save" button within the Add Contacts to Project window.
- The selected Project(s) will populate with the Contact Details window. Click the blue "Save" button to send the client or sub a Project Invitation email.
Looking to manage ClientLink™ and TeamLink™ Permissions? Check out the Manage ClientLink™ and/or TeamLink™ Permissions article to learn how to access & manage permissions settings.
ADDITIONAL INFORMATION
- Permissions: The following users can add ClientLink™ / TeamLink™ Contacts to Projects:
- ConstructionOnline™ Company Administrators
- ConstructionOnline™ Company Employees with ClientLink / TeamLink permissions set to "Can adjust what ClientLink and TeamLink users are able to see in their projects"
- Mobile App: ClientLink™ and/or TeamLink™ Users can be added to Projects exclusively through browser access to ConstructionOnline™.
HAVE MORE QUESTIONS?
- Frequently asked questions (FAQ) regarding the management of ClientLink and TeamLink Users can be found in the FAQ: Managing ClientLink and TeamLink Users article.
- If you need additional assistance, chat with a Specialist by clicking the orange Chat icon located in the bottom left corner or visit the UDA support page for additional options.