BACKGROUND
ConstructionOnline's powerful OnCost™ Estimating software gives construction pros the required tools to create detailed, accurate construction cost estimates and track their project's financial progress from start to finish. Additionally engineered to help streamline important tasks through the execution of scalable, repeatable processes, ConstructionOnline™ Company Users can create a standardized format for all new Items added to an Estimate—known as Item Defaults. With Item Defaults, new Items added to an Estimate will immediately populate with customized settings—saving valuable time and minimizing the risk of user input error.
STEPS TO SET ITEM DEFAULTS WITHIN AN ESTIMATE
- Navigate to the desired Project via the Left Sidebar.
- Select the Financials tab, which will automatically open the Estimating category.
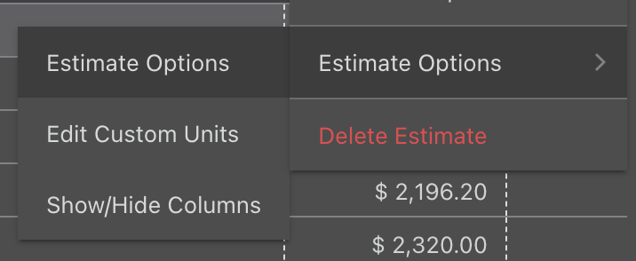
- Click on the grey three dot action menu
 located in the top right corner of the Estimate.
 - Hover your cursor over Estimate Options, then select Estimate Options.
- Within the Estimate Options window, select the Item Defaults tab.
- Using the dropdown menus for Unit, Classification, Status, Markup Type, and Tax Type, select the desired combination of settings.
- Unit: determines the custom unit for each new Estimate Line Item
- The options for Unit are pulled from the list of custom Units for all Estimates in the Company Account. In addition to the 21 preloaded Unit options provided by ConstructionOnline, Company Admin Users can customize the Units used within OnCost™ Estimating by adding new Units or arranging/removing preloaded ones.
- Classification: indicates the classification for each new Estimate Line Item
- Material
- Labor
- Subcontractor
- Equipment
- Other
- Unclassified
- Status: indicates the current status of each new Estimate Line Item
- Estimate: the dollar amount entered has been allocated for the Estimate Line Item but has not yet confirmed by a Bid or Firm amount.
- Firm: the dollar amount for the Estimate Line Item has been confirmed by the appropriate vendor, subcontractor, etc.
- Bid: the dollar amount is derived from a Bid from a vendor, subcontractor, etc.
- Markup Type: determines the markup type for each new Estimate Line Item
- %
- $
- $/unit
- Classification Markups Applied: pulls settings from Classification Markups in accordance to the Classification selected earlier.
- Tax Type: assigns a tax type for each new Estimate Line Item
- Not Taxed
- Taxed Included
- Additional taxes may be shown, which are pulled from Estimate Tax Settings
- Unit: determines the custom unit for each new Estimate Line Item
- Click the blue Save button to finalize your changes and begin adding Estimate Line Items with default settings.
ADDITIONAL INFORMATION
- Once default settings for new Items are set, they will apply to all new Items added in the Estimate. The settings will not apply to existing Items within the Estimate.
- All Standard 3-Level Estimates in ConstructionOnline are compatible with Item Defaults.
- Permissions: To set Item Defaults within an Estimate, Company Users must have Estimating Permissions set as "Can Create, Edit, & Delete".
- Mobile App: default settings for new Items are exclusively accessible via browser access to ConstructionOnline. Estimates are only available in View-Only Mode in the ConstructionOnline Mobile App.
Note: As a best practice, ConstructionOnline recommends that Estimates are created using the Standard (3-Level) Detail structure. However, some legacy Estimates using a 2-Level Detail structure may still be active. In such instances, Subcategory Defaults are available in the place of Item Defaults.
HAVE MORE QUESTIONS?
- Frequently asked questions (FAQ) regarding OnCost Estimating can be found in the FAQ: Estimating article.
- If you need additional assistance, chat with a Specialist by clicking the orange Chat icon located in the bottom left corner or visit the UDA support page for additional options.