OBJECTIVE
To create a schedule from an estimate in ConstructionOnline.
BACKGROUND
With the world's fastest online Scheduling and the most powerful cloud-based Estimating in the industry, ConstructionOnline provides your team with a versatile toolkit engineered for project success. Scheduling and Estimating in ConstructionOnline work seamlessly hand-in-hand, allowing you to directly create a schedule from an estimate—saving valuable time and labor.
THINGS TO CONSIDER
- An estimate for a Project must exist before a schedule can be generated from an estimate.
- If an estimate does not already exist, learn how to Create an Estimate.
- Company Employees must have BOTH Estimating and Schedules Permissions set as Can Create, Edit, & Delete in order to create a schedule from an estimate.
- Users cannot generate a schedule from an estimate using the ConstructionOnline Mobile App.
- While creating a schedule from an estimate is a valuable and efficient method to ensure cohesive project management, it is important to note that the schedule and estimate function independently beyond schedule creation. Generating a schedule from an estimate does not create an active sync between the two.
- For example, if items are added to the estimate after the schedule was created, the schedule will not be automatically updated with the new items.
In a schedule created from an estimate:
- Schedule Groups are Estimate Categories and Subcategories.
- Schedule Tasks are Estimate Items.
- Start/End dates for each task are set as the date the schedule was generated. Users will need to manually enter Start/End dates for each task.
- Any resources assigned in the estimate will transfer over to the schedule.
STEPS TO CREATE A SCHEDULE FROM AN ESTIMATE
- Navigate to the desired Project using the Left Sidebar.
- Select the Financials tab to automatically open your Estimate.
- Click either the three dot menu located in the top left corner of your estimate OR the Estimate Toolbar.
- Select the option to Create Schedule from Estimate.
- If the Project already contains a schedule, a Schedule Already Exists warning will populate. Clicking the blue Continue button will override the existing schedule, which cannot be undone!
- Choose which items and classifications you want to include or exclude in your schedule using the checkboxes and dropdown menu presented in the Schedule Generation Options window.
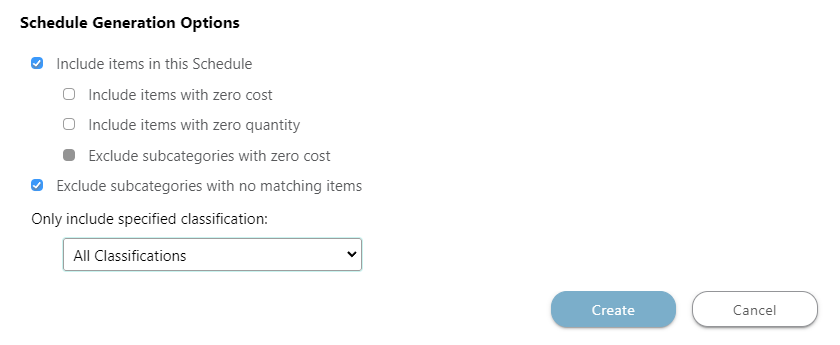
- Include items in this Schedule: estimate items will appear as schedule tasks in your new schedule.
- Include items with zero cost: estimate items with zero cost will also appear as schedule tasks in your new schedule.
- Include items with zero quantity: estimate items with zero quantity will also appear as schedule tasks in your new schedule.
- Exclude subcategories with zero cost: subcategories with zero cost will not be included in your new schedule. By default, this option is grayed out. If you uncheck the box for Include items in this Schedule, you will gain access to this checkbox.
- Exclude subcategories with no matching items: subcategories with no matching items will not be included in your new schedule.
- Only include specified classification: only subcategories marked as the specified classification will appear in your new schedule. Classifications include:
- All Classifications
- Material
- Labor
- Subcontractor
- Equipment
- Other
- N/A
- Include items in this Schedule: estimate items will appear as schedule tasks in your new schedule.
- Click the blue Create button to generate your schedule. A small pop-up will appear in the bottom left corner of your screen, confirming that the schedule has been created.
- Click on the words Go To in the pop-up to view your schedule.
- If the pop-up disappears before you can click on it, don’t worry! You can access your new schedule by selecting the Calendars & Schedules tab and clicking on the Scheduling category.
HAVE MORE QUESTIONS?
- Frequently asked questions (FAQ) regarding OnPlan Scheduling can be found in the FAQ: Scheduling article.
- If you need additional assistance, chat with a Specialist by clicking the orange Chat icon located in the bottom left corner or visit the UDA support page for additional options.