Set the Order of Selections
Keep construction selection sheets organized with ConstructionOnline’s intuitive, easy-to-use Client Selections management tool
BACKGROUND
ConstructionOnline's toolkit for managing new home selections empowers construction teams to present, organize, and track selection sheets with ease. With user-friendly online access and sensible notifications, ConstructionOnline's Client Selections streamlines construction project management, improves team communication, and increases client satisfaction. Capabilities such as the ability to set the order in which Selections appear help construction teams work more efficiently to deliver better results.
STEPS TO SET THE ORDER OF SELECTIONS
- Navigate to the desired Project via the Left Sidebar.
- Click the Financials tab and choose the Client Selections category.
- Scroll to the Selections Details pane and find your desired Selection category. Right-click next to the desired Selection and select Set Selection Order.

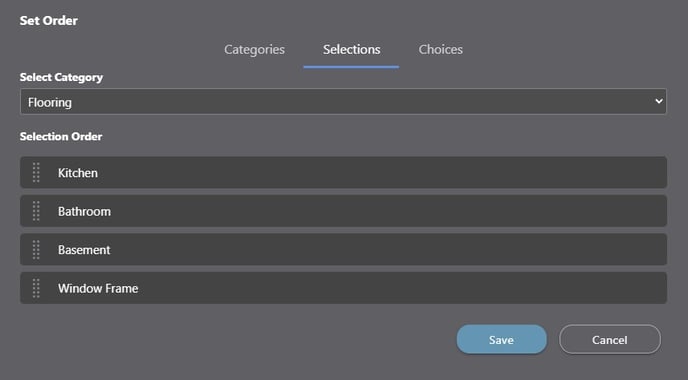
- Within the Set Order window, ensure that you are in the Selections tab.

- From the Select Category dropdown menu, choose the Category containing the Selections you wish to re-order.
- Using the Drag & Drop function, arrange the Selections as desired within the Category.
- To finalize the Selections Order and update the project's Selections, click the blue "Save" button.
ALTERNATIVE ACCESS POINT
- You can also access the Set Selection Order function from the Selections pane.
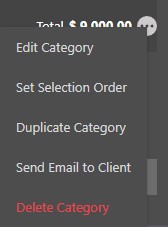
- Hover over the Category that houses the Selections you wish to reorder until the gray three-dot Actions Menu appears on the right-hand side of the row.
- Click the three-dot action menu and select Set Selection Order.

- Then follow Steps 4-6 above.
ADDITIONAL INFORMATION
- Permissions: Only ConstructionOnline™ Company Users with “Can Create, Edit, & Delete” permissions for Client Selections can set the order of Selections.
- ClientLink™ and TeamLink™ Users cannot set the order of Selections, however they may have permission to view, approve, or even create Selection Choices.
- Depending upon the Company’s ClientLink™ Settings, ClientLink™ Users may be able to:
- View Selections and choose from those displayed
- Create Selection Choices
- Depending upon the Company’s TeamLink™ Settings, TeamLink™ Users may be able to:
- Access Selections where they are listed as a Recommended Vendor and/or additional available Selections
- Receive Selection email notifications
- Depending upon the Company’s ClientLink™ Settings, ClientLink™ Users may be able to:
- ClientLink™ and TeamLink™ Users cannot set the order of Selections, however they may have permission to view, approve, or even create Selection Choices.
- Mobile App: The order of a project's Selections can be modified by Company Users via the ConstructionOnline™ Mobile App.
HAVE MORE QUESTIONS?
- Frequently asked questions (FAQ) about Client Selections can be found in the article FAQ: Client Selections.
- If you need additional assistance, chat with a Specialist by clicking the orange Chat icon located in the bottom left corner or visit the UDA support page for additional options.