
BACKGROUND
Labor costs can vary depending on the type of work being performed. For example, the same employee may have one hourly rate for framing and another for operating equipment. Accounting for those differences helps companies calculate labor expenses based on the work completed rather than relying on a single general rate.
Cost Code Pay Rates in ConstructionOnline™ allow you to assign an employee-specific hourly rate to a particular Cost Code. When the employee logs time against that Cost Code, the associated Pay Rate is applied automatically instead of their default rate. The result is more precise labor costing that reflects both who performed the work and what work was completed.
THINGS TO CONSIDER
- A default Pay Rate for the employee is required before Cost Code Pay Rates can be set. If no default rate exists, ConstructionOnline will prompt you to set one first. See Set Employee Pay Rates.
- Cost Codes without a set rate use the employee's default Pay Rate. Setting a rate for one Cost Code does not affect the defaults or any other Cost Code rate.
- Each Cost Code has its own Pay Rate, OT Multiplier, and OT Rate, linked by the relationship Pay Rate x OT Multiplier = OT Rate. Editing any one of these values will change the calculation and subsequent updates will be applied.
- For example, if the Pay Rate is set to $26 and the OT Multiplier is set to 1.5, then the OT Rate = $39. If the OT Multiplier is updated to 2.0, then the OT Rate is also update to $52, because of the relationship of the values in the calculation.
- To read more about rate precedence and overtime calculations, see Overview: What are Pay Rates?
HOW TO SET COST CODE PAY RATES
- Navigate to the Time Summary within Time Tracking.
- Click on the gray 3-dot Action Menu at the top of the Employees table and select the option for Time Tracking Settings from the dropdown menu to open the Time Tracking Settings window.
- Select the "Pay Rate Settings" tab.
- For the desired employee, hover their row within the table of employees to reveal the gray 3-dot Action Menu. Click there and select the option to "Manage Pay Rates."
- This opens the employee's Set Pay Rates window. The green "Defaults section at the top displays the employees default Pay Rate, OT Multiplier, and OT Rate.

- This opens the employee's Set Pay Rates window. The green "Defaults section at the top displays the employees default Pay Rate, OT Multiplier, and OT Rate.
- Within the Set Pay Rates window, you will see a list of Company Cost Codes. Choose the desired Cost Code Set from the list on the left.
- Cost Codes that are divisions appear in bold with a collapsible arrow that allows you to collapse or expand the individual Cost Codes included within the division.
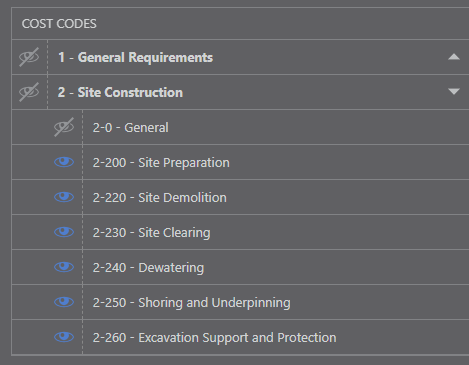
- Cost Codes that are divisions appear in bold with a collapsible arrow that allows you to collapse or expand the individual Cost Codes included within the division.
- Click into the "Pay Rate" column within the desired Cost Code's row to enter/modify the Pay Rate. Adjust the OT Multiplier or OT Rate for that row as needed.
- If a default Pay Rate has not been previously set, ConstructionOnline will display a message prompting you to set employee defaults before Cost Code-specific Pay Rates can be configured.
- Cost Codes without a customized Pay Rate will continue to use the employee's default settings for Pay Rate, OT Multiplier, and OT Rate.
- Finalize Pay Rates for the selected employee by selecting the blue "Save" button.
Note: Editing a Cost Codes OT Rate updates that row's OT Multiplier to keep Pay Rate x OT Multiplier = OT Rate true. The Pay Rate for that Cost Code will remain the same.
Editing a Cost Code row never changes the Pay Rate Defaults or any other row.
TIPS & TRICKS
- Select the option to "Hide Default Rates." Checking this checkbox hides every Cost Code still using the default rate, leaving only Cost Codes with their own customized rates. If a Cost Code with a set rate sits beneath a parent/division without one, both remain visible so the hierarchy stays intact.
- Utilize the "Search Cost Codes" box to filter the table to Cost Codes matching the entered search query. If a Cost Code sits beneath a parent/division and matches the search query, the Cost Code and the parent/division remain visible.
- Clear the search with the X or by deleting the text to show all Cost Codes again.
- Apply Cost Code Pay Rates to past shifts. Updated Cost Code Pay Rates apply to future shifts by default. To also apply them to shifts already logged, use the retroactive option within the Set Pay Rates window. You can easily define a date range if you wish to apply the updated rates to time shifts within a specific timeframe. See Apply Cost Code Pay Rates to Past Shifts to learn more.
 ADDITIONAL INFORMATION
- Alternative Access Point: You can also set an employee's Pay Rates within the Pay Rate Settings tab of their Contact Details window.
- Subscription Level: The Pay Rates feature is available for any active ConstructionOnline subscription with access to Time Tracking, whether included at the Business and Enterprise levels or as a Per-Company Add-On.
- Permissions: Select the option stating "User can view/manage pay rates for other users" to enable access for Company Users who should be able to set Pay Rates for Employees.
HAVE MORE QUESTIONS?
- If you need additional assistance, chat with a ConstructionOnline Specialist by clicking the orange Chat icon in the bottom left corner or visit the UDA Support Page for more options.