Import Contacts
Using Contacts in ConstructionOnline, organize and manage your Contact List with ease.
OBJECTIVE
To import your Contacts from Excel into ConstructionOnline.
BACKGROUND
ConstructionOnline empowers construction teams to collaboratively manage construction jobs from start to finish within a single, comprehensive online system. With ConstructionOnline's intuitive Contact Management & CRM toolkit, discover simple, convenient methods for adding, managing, and deleting contacts on your Contacts List.
THINGS TO CONSIDER
- Contacts in ConstructionOnline can contain the following fields:
- Display Name, First Name, Middle Name, Last Name, Company Name, Address, City, State, Zip Code, Email Address, Phone Number, Mobile Phone Number, Fax, Website, Contact Group, Trade, Contact Category, Office, Division, Region, and Quality.
- Each contact is required to have a First Name, Last Name, and valid Email Address; all additional fields are optional.
- To import Contacts, a Company User must utilize the ConstructionOnline Import Template for Excel.
- The template structure should not be edited. Any changes to the template will cause the import to fail.
- Company Employees should not be imported into ConstructionOnline — they must be manually added one at a time. Learn how to Add a Company Employee.
- By default, Contacts imported into ConstructionOnline are automatically saved as Basic Contacts.
- Contacts cannot be imported using the ConstructionOnline Mobile App.
STEPS TO IMPORT CONTACTS
- Navigate to the Contacts page using the Left Sidebar.
- Click the green (+) Add New Contact button.
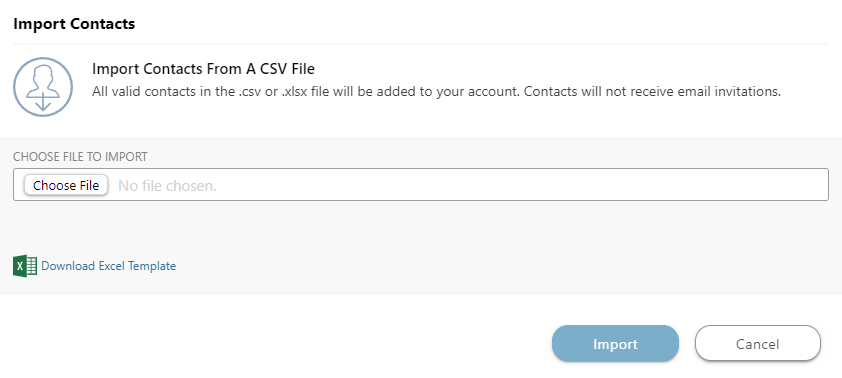
- Select Import Contacts, located in the bottom left corner of the Add New Contact window.
- Click Download Excel Template to download the Import Contacts Template provided by ConstructionOnline.

- Enter your Contacts into the Template and save the file.
- Each Contact is required to have a First Name, Last Name, and valid Email Address in order to be imported into ConstructionOnline. All other fields listed in the template are optional and can be added later if needed.
- Refrain from editing the structure of the template. For any Contact Import to be successful, all columns and column headers must remain as presented in the file for import - including empty or blank columns. Any Contact Import will not be successful if columns are deleted, column headers are changed, or the template structure is otherwise edited in any way.
- Navigate back to the Import Contacts window and select Choose File. Using your device's file manager, locate the saved template file.
- Click the blue Import button to import your Contacts.
ALTERNATIVE ACCESS POINT
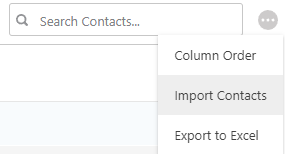
- You can also use the three dot action menu to Import Contacts.
-
- Navigate to the Contacts page using the Left Sidebar.
- Click the grey three dot action menu located in the top right corner of the page, next to the Search Contacts bar.
- Select Import Contacts.

- Follow steps 4 - 7 as listed above.
-
HAVE MORE QUESTIONS?
- Frequently asked questions (FAQ) regarding Contacts can be found in the FAQ: Contacts article.
- If you need additional assistance, chat with a Specialist by clicking the orange Chat icon located in the bottom left corner or visit the UDA support page for additional options.