BACKGROUND
With Client Selections, ConstructionOnline's powerful solution for managing home selections, construction pros can create detailed selection sheets for clients to view & approve. ConstructionOnline™ Company Users can use one of several options to build selection sheets––such as the option to directly import selections from Excel to ConstructionOnline. Importing selections saves crucial time during the home selections process and provides construction pros with a more efficient & accurate way to build selection sheets.
PREREQUISITES
- ConstructionOnline provides an Excel template for importing selections. Download the template to ensure that selections are properly formatted for successful import.
- For the import to be successful, each Category, Selection, and Selection Choice included for import must be populated on an individual row within the corresponding column, as illustrated below:
CATEGORY SELECTION SELECTION CHOICE Category A Selection A Selection Choice 1 Selection Choice 2 Selection B Selection Choice 1 Selection Choice 2
- For the import to be successful, each Category, Selection, and Selection Choice included for import must be populated on an individual row within the corresponding column, as illustrated below:
STEPS TO IMPORT CLIENT SELECTIONS FROM EXCEL
- Navigate to the desired Project via the Left Sidebar.
- Select the Financials tab, then choose the Client Selections category.
- Scroll down to the Selections dashboard and click on the grey three dot menu located in the top right corner.
- Select the option Import from Excel.
- This will open up an Import Selections window. Download the Selection Excel Import template to ensure proper formatting of Selections for successful import. Data must be properly formatted to accurately populate Categories, Selections, Choices, and additional details via import.
- Once data has been entered into the Excel spreadsheet, review to confirm that it does follow the required import format, as illustrated within the import template and the depiction above. Each Category, Selection, and Selection Choice must be populated to an individual row within the corresponding column for data to import successfully.
- After confirming the Selections data is formatted properly for import, save the Excel file as a .XLXS or .CSV file.
- Navigate back to the Import Selections window in ConstructionOnline and click the Choose File button to locate & select the saved Excel file.
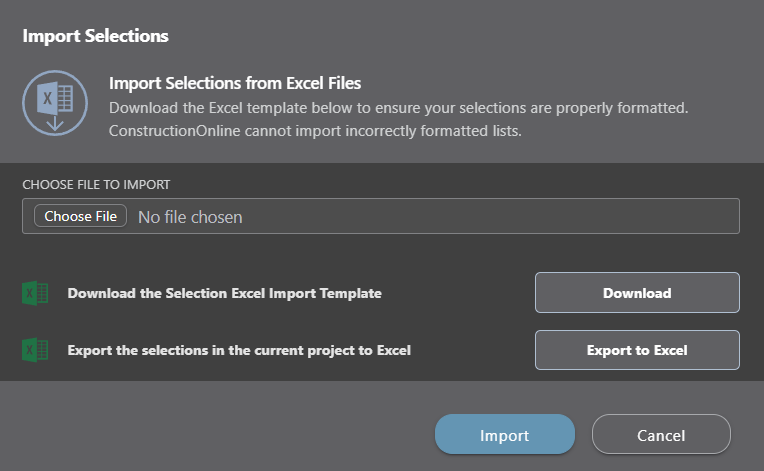
- Click the blue Import button to initialize the import of Selections data.
- ConstructionOnline will display a system message as the import processes, and once completed, the system will confirm by displaying a message stating "Selections Import Complete."
- Click the blue View Selections button to navigate to the newly imported Selections, or click the Close button to close the message window.
ADDITIONAL INFORMATION
- The following file types are acceptable for import: .XLXS and .CSV.
- Permissions: Company Users must have permissions for Client Selections set as "Can Create, Edit, & Delete" to import selections into ConstructionOnline.
- ClientLink/TeamLink Access: ClientLink™ and TeamLink™ Users cannot import Client Selections from Excel; however depending upon the ConstructionOnline™ Company's ClientLink™ / TeamLink™ Settings, they may have permission to view, approve, and/or create Selection Choices.
- Mobile App: Importing Client Selections from Excel is exclusively available via browser access to ConstructionOnline.
HAVE MORE QUESTIONS?
- Frequently asked questions (FAQ) about Client Selections can be found in the article FAQ: Client Selections.
- If you need additional assistance, chat with a Specialist by clicking the orange Chat icon located in the bottom left corner or visit the UDA support page for additional options.