Import Financials from QuickBooks Online
OBJECTIVE
To import Financial Data from QuickBooks Online to ConstructionOnline.
BACKGROUND
Integrating your ConstructionOnline estimates with QuickBooks Online allows for easy creation of bills, customers, invoices and more, eliminating redundant data entry and improving accuracy and efficiency.
THINGS TO CONSIDER
- Your company's QuickBooks Online administrator will need to approve the integration process.
- ConstructionOnline Projects sync as QuickBooks Online Sub-customers and integration must be activated in ConstructionOnline per-project settings.
- Only ConstructionOnline Company Administrators can sync ConstructionOnline and QuickBooks Online.
STEPS TO IMPORT FROM QUICKBOOKS ONLINE
A. From the Accounting Integration category:
- Navigate to the desired Project via the Left Sidebar
- Select the Financials tab
- Choose the Accounting Integration category
- Locate the Import from QuickBooks dropdown menu
- Select Actuals, Invoiced Amounts or Committed Costs
- Click Import

- This will open the Import from QuickBooks Online window
- Choose what to include with your Import
- Click Import
- The Activity Log will update once the data has imported

B. From the Estimate Sidebar:
- Navigate to the desired Project via the Left Sidebar
- Select the Financials tab
- This will automatically open the Estimating category
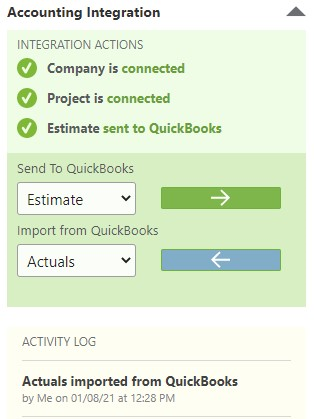
- Locate the Accounting Integration widget via the right Estimate Sidebar
- Locate the Import from QuickBooks dropdown menu
- Select Actuals, Invoiced Amounts or Committed Costs
- Click the blue arrow button
- The Activity Log will update once the data has imported

HAVE MORE QUESTIONS?
- Frequently asked questions (FAQ) about ConstructionOnline's QuickBooks Online integration can be found in the article FAQ: Integrating with QuickBooks Online.
- If you need additional assistance, chat with a Specialist by clicking the orange Chat icon located in the bottom left corner or visit the UDA Support Page for additional options.