BACKGROUND
ConstructionOnline’s ClientLink Portal makes it easy for clients to stay informed and engaged in their construction project(s). With the RFI Tracking feature, clients can have direct access to create and manage Requests for Information, so they can easily ask questions and get the clarification they need. No more waiting for phone calls or sifting through emails—the Portal centralizes all RFI communication, giving everyone involved a clear view of the process and ensuring questions are addressed promptly.
HOW TO CREATE AN RFI FROM THE CLIENTLINK PORTAL
- Access the ClientLink portal.
- Navigate to the desired Project via the Left Sidebar.
- Within the Project, expand the Project and Feature Menu by clicking "Show Project Menu."

- Select "Requests for Information" under the "Communication" section.
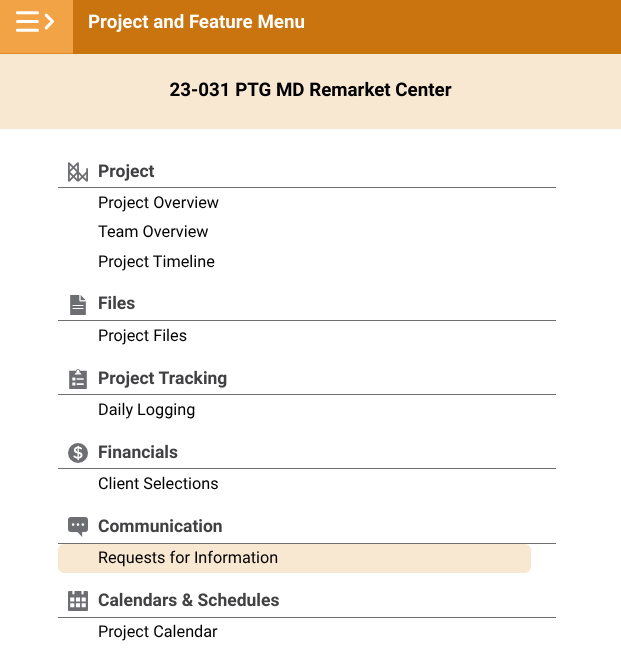
- If the “Communication” section, or the Requests for Information feature, isn’t available in your ClientLink Portal, contact your builder to inquire about access.
- Click on the green (+) Add RFI button to open the “New Request for Information” window.

- Enter information about the RFI, including -
- Details: General information about the Request for Information.
- Related Project: The Project that the RFI is associated with.
- By default, ConstructionOnline populates the current Project. This field cannot be modified.
- To: Specify the Contact(s) to whom you want to send the RFI. This field is required.
- Number: The number assigned to the RFI for organizational purposes.
- ConstructionOnline assigns a sequential number by default, reflecting the total number of previously created RFIs. However, the number can be changed or deleted.
- Subject: Give the RFI a title.
- Authored By: Identify the Contact requesting the information.
- ConstructionOnline, by default, populates the user's Contact who is creating the RFI. The author can be changed or removed.
- Assigned To: Designate the Contact(s) responsible for the RFI.
- Due Date: Specify the date the RFI response is due.
- Added Days: Enter the number of days added to the Project schedule due to the RFI.
- Drawing Number: Enter the relevant drawing number if the RFI is associated with the Project’s plans.
- Location: Specify the location related to the RFI.
- Trade: Select the relevant trade.
- Complexity: Indicate the complexity level of the RFI.
- Cost Impact: Describe any potential cost impact associated with the RFI.
- By default, ConstructionOnline has the "To Be Determined" box selected. This is useful when the cost impact is unknown.
- Cost Code: The relevant Cost Code. This field cannot be modified.
- CC: Add Contact(s) to be carbon copied on the RFI.
- Question / Clarification Needed: State the question or clarification needed. This field is required.
- Related Project: The Project that the RFI is associated with.
- Attachments: Upload or drag and drop any Files and/or Photos pertinent to the RFI.
- Details: General information about the Request for Information.
- Click either the blue “Create RFI” button or the “Create RFI & Send Emails” button.
- Selecting the “Create RFI & Send Emails” button will send emails to the Assigned Resource(s).
- You can also save the RFI as a draft to finalize later by clicking the "Save Draft" button.
ADDITIONAL INFORMATION
- Permissions: ClientLink permissions are managed by ConstructionOnline Company Users. If you have questions about what is/is not accessible through your Client Portal, contact your builder directly.
- CO™ Mobile App: ClientLink Users with the appropriate permissions can create and manage RFIs via the ConstructionOnline Mobile App.
HAVE MORE QUESTIONS?
- Frequently asked questions (FAQ) about RFIs can be found in the article FAQ: RFIs.
- If you need additional assistance, chat with a ConstructionOnline Specialist by clicking the orange Chat icon located in the bottom left corner, or visit the UDA Support Page for additional options.