Create a New Blank Document
OBJECTIVE
To create a New Blank Document in ConstructionOnline™
BACKGROUND
ConstructionOnline™ is expertly engineered to help construction companies streamline project management through the ease of use and functionality of the software. ConstructionOnline’s feature-rich Document editor can create and edit Blank Documents that can be stored in your project files. Use these Blank Documents to fulfill any of your business’s needs, including the setup of a Document in a project template that can be used over and over again.
THINGS TO CONSIDER
- Blank Documents can be saved independently or to a Project’s files.
- Blank Documents can be exported for use in Word or other text processing applications.
- Documents can be downloaded, printed and shared via Email or by uploading to an Integrated Cloud Storage.
- Administrators and Company Users with permission are able to create blank documents.
STEPS TO CREATE A NEW BLANK DOCUMENT
- Navigate to Company Files, My Files, or a Project via the Left Sidebar
- Select the Files tab if you're in a Project
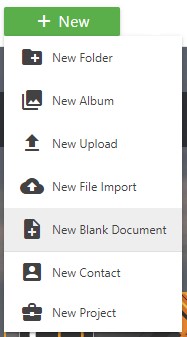
- Click the green +New button at the top of the screen
- Select New Blank Document

- This will open the New Blank Document in a new tab
- Enter the desired information into your Document
- Note: To expand the editor toolbar for more editing options, select Show Full Toolbar from the top right of the Mini Bar
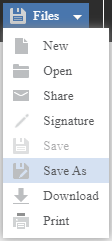
- Click on Files at the top left of the page
- Select Save As from the dropdown menu

-
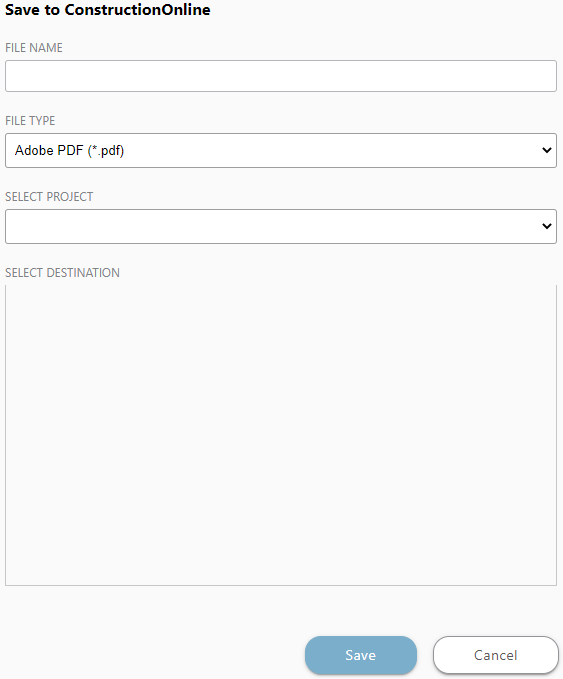
- This will open the Save to ConstructionOnline window
- Name the file, select the File Type, and Destination to save it to
- Click Save

HAVE MORE QUESTIONS?
- Frequently asked questions (FAQ) about Files & Photos can be found in the article FAQ: Files & Photos.
- If you need additional assistance, chat with a Specialist by clicking the orange Chat icon located in the bottom left corner or visit the UDA support page for additional options.