
BACKGROUND
When a company tracks its crews’ time, each logged shift carries an associated labor cost based on the employee’s applicable Pay Rate. ConstructionOnline™ allows users to turn those tracked costs into Labor Expenses by selecting completed Time Shifts and compiling their hours and labor costs into an expense record within the Purchasing module.
This connected workflow ensures that logged time is accurately reflected in project financials without requiring users to manually calculate labor totals or re-enter shift data.
THINGS TO CONSIDER
- Labor Expenses can be created at the Company or Project level.
- When started from within a project, the associated Project is automatically set and locked for that expense record.
- When started from the Company Overview > Purchasing, the Project will need to be selected during expense creation.
- One Labor Expense per project is generated across the shifts that match your filters. Only shifts matching the selected filters—Date Range, Project, Cost Code Set, Cost Code, and/or Employee—are included.
- Line Item Formatting controls how the included shifts' costs are grouped on each expense—either a single labor line item or with individual line items for each included Cost Code.
HOW TO CREATE A LABOR EXPENSE FROM A TIME SHIFT
- Navigate to Purchasing at either the Company or Project level
- Select the Labor Expenses tab
- Click the green (+) Create New Labor Expense button and select "...from Time Tracking Shifts" as the expense source from the dropdown menu.
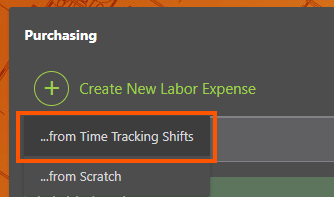
- This will open the "Create New Expense from Time Shifts" wizard, which will guide you step-by-step through the process of creating the Labor Expense record.
- Filters & Options allow you to define which shifts to include:
- Date Range: Choose a preset range (such as Current Pay Period, Last 30 Days, or This Month) and the Start Date and End Date will automatically update accordingly. Click into the Start Date and End Date fields to manually adjust the date range further.
- Project: Automatically selected and locked in when accessing Purchasing within a Project. Must be manually selected when accessing Purchasing from the Company Overview.
- Cost Code Set and Cost Code allows you to limit Time Shifts included for the Labor Expense by defining the Cost Code Set and/or individual Cost Code(s).
- Employee: Refines included Time Shifts by associated Company Employee.
- Line Item Formatting: Choose how the labor costs from the Time Shift(s) are grouped on the generated Expense record:
- Generate expenses with a single line item: Costs will be aggregated as a single line item for each expense.
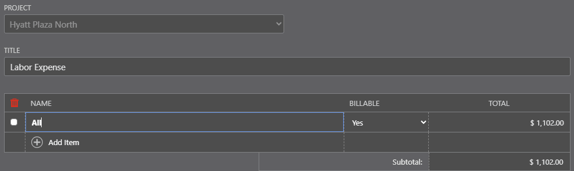
- Generate expenses with line items by cost code: A line item will be generated for each cost code associated with time shifts.
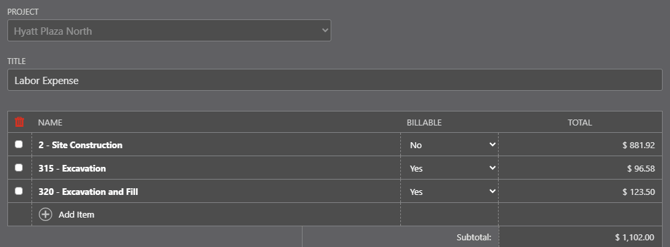
- Generate expenses with a single line item: Costs will be aggregated as a single line item for each expense.
- Filters & Options allow you to define which shifts to include:
- Click the blue "Next Step" button to generate the Labor Expense.
- If no shifts match the selected filters, the platform will display a message to inform you that there is no data that matches the filters. Adjust applied filters for a better result.
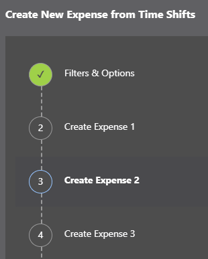 If multiple projects are available/selected, then a separate Labor Expense record will be created for each project. On each generated Labor Expense, review and complete the expense details for each expense record:
- Confirm Project
- Enter Title
- Set Status, Tags, and Notes as needed
- Review the line items generated per expense formatting choice (single line item v line item by cost code)
- Add, edit, or remove items as needed and set each item's Name, Billable Status, and Total.
- Enter Tax as a percentage or dollar amount, when applicable.
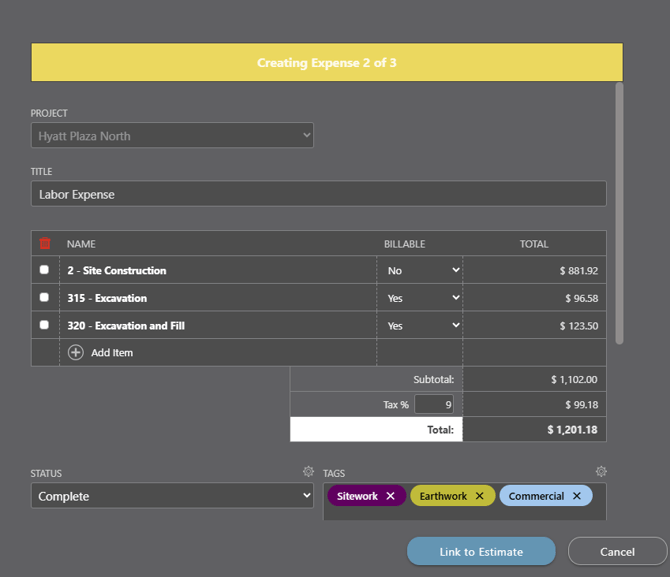
- If the project has an associated Estimate, you will see the blue button reading "Link to Estimate" — click to open options for linking to Estimate Category, Subcategory, and/or Line Item. See Link Labor Expense Line Items to Estimate.
- Click "Save and Continue" to create the Labor Expense(s).
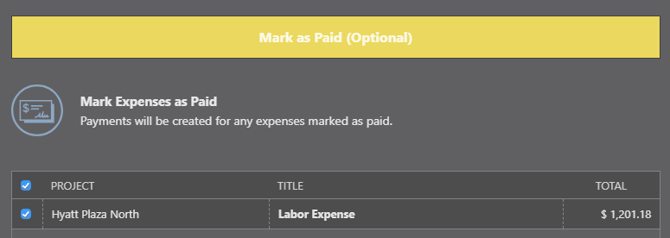
- Select the Mark as Paid (Optional) tab and check any saved expenses that should be marked Paid in Full. The total of the selected expenses is shown below the table.
- Choose the Summary tab to review each finalized Labor Expense's Project, Title, Paid Status, and Total.
- Click "Finish" to save the Labor Expenses and create Payments for any expenses where "Mark as Paid" was selected.
Note: Marking a Labor Expense as "Paid" takes effect only upon selecting "Finish" in the Labor Expense creation wizard.
If you close or cancel the wizard before selecting "Finish," the generated Labor Expenses are still saved, but the no payments are created.
ADDITIONAL INFORMATION
- Subscription Level: The Labor Expenses feature is available for any active ConstructionOnline subscription with access to OnCost Purchasing, whether included at the Team, Business, and Enterprise levels or as a Per-Company Add-On.
- Permissions: Admin Users and Company Users with "Can Create & Edit" or "Can Create, Edit, & Delete" Expenses & Receipts permissions can create Labor Expenses from Time Tracking Shifts.
HAVE MORE QUESTIONS?
- If you need additional assistance, chat with a ConstructionOnline Specialist by clicking the orange Chat icon in the bottom left corner or visit the UDA Support Page for more options.