Quick Start Guide
Learn how to get started with the ConstructionOnline API
The ConstructionOnline API serves as a way for construction companies to keep their information up-to-date, extract & share data, and build robust integrations with other software platforms. By leveraging and managing your company data with the API, you can get the most value out of your ConstructionOnline company account. This article will help you learn how to get started with the ConstructionOnline API in just a few simple steps. It also includes instructions for setting up a simple development environment that can be used to make requests against the API.
👉 If you are unfamiliar with the ConstructionOnline API or APIs in general, we recommend checking out the ConstructionOnline API Overview article for a detailed overview before attempting setup.
ConstructionOnline API Basics
The ConstructionOnline API is a RESTful API that uses predictable URLS to access resources and standard HTTP features such as methods (GET, POST, PUT) and response codes.
⭐ The base URL for all requests to the ConstructionOnline API is:
https://api.constructiononline.com/
All requests will start with the base URL, followed by the specific path for the endpoint. For example, the path for getting an entire contact list is api/v2/Contacts. Combining the two will give you the full URL for the endpoint:
https://api.constructiononline.com/api/v2/Contacts
Setup Instructions
To start using the ConstructionOnline API, you will need to complete the following steps:
1. Get API access key
The ConstructionOnline API is a closed, private API. Access is only available to companies with Business or Enterprise subscriptions to ConstructionOnline. If your company is eligible and would like API access, reach out to the ConstructionOnline development team by sending an email to api@uda1.com and request that your access is turned on.
The ConstructionOnline development team will provide your company with an API key for project authorization. The API key is a unique string of randomly generated characters; it must be included in every request you make to the API. In addition to your API key, your ConstructionOnline login credentials (email address and password) must be included in every request you make to the API.
⚠️ IMPORTANT INFORMATION: When working with the API, note that all requests are made against real data in your ConstructionOnline company account. Any resources that are created, deleted, or updated via the API will be reflected in your ConstructionOnline account in real-time. If you wish to have a separate working environment and operate on test data, please contact the ConstructionOnline development team to request a developer sandbox. Requests will be evaluated by the ConstructionOnline development team and granted on a case-by-case basis.
2. Set up development environment
After receiving an API key, you will need set up a development environment to begin making requests against the API. If you are going to be working in C#, we recommend using an Integrated Development Environment (IDE) such as Visual Studio. If you are going to be working in JavaScript or Python, we recommend using a code editor such as Visual Studio Code. If you are going to use the command-line tool cURL, you can use the built-in command prompt in Windows or Terminal in macOS.
Alternatively, API requests can be made with a third-party API tool like Postman. Postman is a low code API platform that allows you to explore APIs without using a specific coding language. To install Postman, visit the Postman website, download the correct installation package, and follow the instructions provided for installation.
Disclaimer: ConstructionOnline does not provide any support for Postman or other third-party API management tools. For assistance, see Postman's documentation.
Install Visual Studio for C# Development (Windows only)
- First, download Visual Studio.
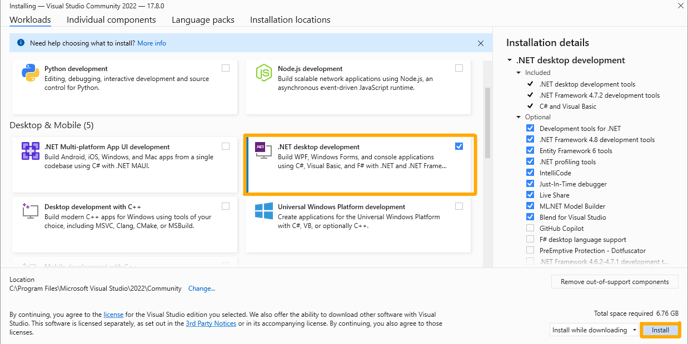
- After the Visual Studio Installer has downloaded, select the .NET desktop development option and click the Install button located in the lower right-hand corner.

- Let the Visual Studio Installer download the requested packages and perform the installation. This can take anywhere from a few minutes to an hour, depending on your internet connection and system's capability.
- Once the installation is complete, open Visual Studio. You can choose to sign into your Microsoft account, create a new account, or proceed without signing in by clicking on the "Skip this for now" option.
- Choose your color theme, then click the Start Visual Studio button.
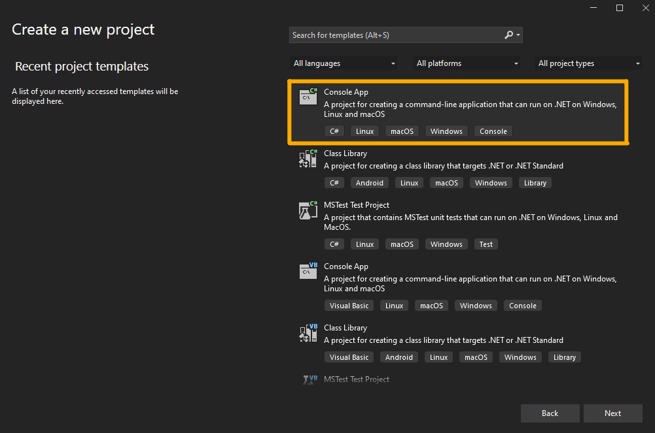
- Select Create a new project, then select the C# Console App option.

- Configure your new project by entering a name and assigning a location to store the project files, then click the Next button. Then, click the Create button.
Set up Visual Studio Code for Python (Windows or macOS)
- First, download and install Visual Studio Code.
- Next, install Python on your machine. Go to python.org and select the Downloads tab to locate the download for your machine.
- To verify that you've successfully installed Python on your machine, you can run one of the following commands for your operating system. Use command line for Windows and Terminal for macOS.
- Windows: py --version
- macOS: python --version
- To verify that you've successfully installed Python on your machine, you can run one of the following commands for your operating system. Use command line for Windows and Terminal for macOS.
- Next, open Visual Studio Code and install the Python extension for VS Code. To do this, click on the Extensions icon, search for "Python" in the extension library and click the Install button.
- Now that the extension has been installed, you can begin working with Python.
- Visit this tutorial to learn how to run programs in Python using VS Code
Set up Visual Studio Code for JavaScript (Windows or macOS)
- First, download and install Visual Studio Code.
- Next, open Visual Studio Code and install the Node.js extension for VS Code. To do this, click the Extensions icon, search for "Node.js extension pack" in the extension library, and click the Install button.
- You will also need to install Node.js for your machine. The Node Package Manager is included in the extension pack distribution.
- Now that the Node.js extension has been installed, you can begin working with JavaScript.
- Visit this tutorial to learn how to run programs in JavaScript using VS Code.
Disclaimer: ConstructionOnline does not provide any support for Visual Studio, VS Code, or any other third-party tools.
⭐ After completing the steps in this Quick Start Guide, you are ready to begin making your first API request!